
Scuffed Plastic with Rough Marks | Free PBR
Seamless texture (tileable) · PNG, WEBP, PBR ZIP. License: AITextured Free Commercial License (FCL) v1.1. Free personal and commercial use. Raw resale, standalone redistribution, mirroring/scraping, competing asset packs, and AI/ML training are not allowed without written permission. Attribution is not required, but appreciated..

| ID | 3d-printed-pla-layer-lines |
|---|---|
| Category | Plastic |
| Formats | PNG, WEBP, PBR ZIP |
| Size | 1k (1024x1024px), 2k (2048x2048px), 4k (4096x4096px), 8k (8192x8192px) |
| Color | sRGB |
| Tileable | Yes |
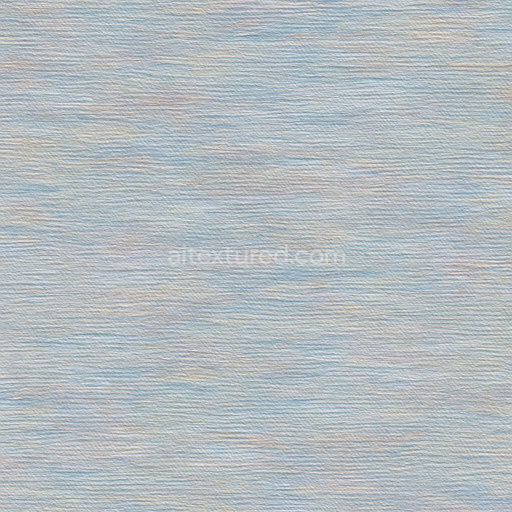
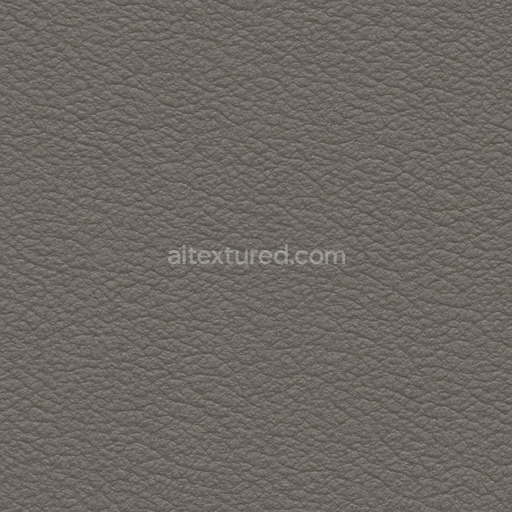
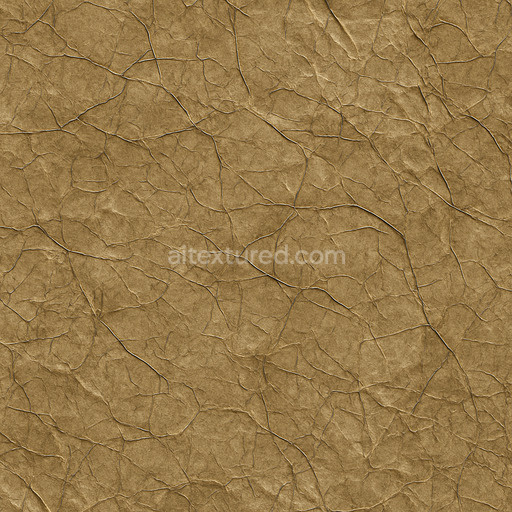
The 3D Printed PLA Layer Lines texture is a meticulously crafted and seamless material designed specifically for the plastic category replicating the distinctive surface finish of 3D printed polylactic acid (PLA) objects. PLA a popular biodegradable polymer used in additive manufacturing forms layers that create subtle ridges and grooves as the filament extrudes and cools resulting in the characteristic layer lines visible on printed surfaces. This texture captures those micro-scale details with exceptional clarity simulating the slightly porous yet structurally consistent makeup of PLA plastic. The base substrate’s polymer composition is reflected in the BaseColor/Albedo channel which exhibits a smooth slightly matte plastic tone while fine normal map details emphasize the layer orientation and grain imparted by the printing process. The roughness map balances semi-glossiness and tactile friction mirroring how natural PLA surfaces scatter light due to their fine striations and minimal surface imperfections. Minimal metallic influence is present aligning with the non-metallic nature of the material while ambient occlusion and height/displacement maps add realistic depth and shadowing to reinforce the layered topology typical of 3D printed plastics.
This tileable 3D Printed PLA Layer Lines texture is optimized for production-ready workflows supporting resolutions up to 8K to ensure micro-detail fidelity even on large UV islands. Its seamless design allows for smooth repetition across extensive surfaces without visible seams or pattern breaks making it ideal for both real-time 3D preview applications and high-fidelity cinematic renders. The texture set integrates effortlessly with popular 3D software such as Blender Unreal Engine and Unity streamlining your iteration loop and enhancing project efficiency. By accurately simulating the polymer’s surface finish—complete with subtle layer ridges slight porosity and the characteristic sheen of PLA plastic—this texture 3d printed pla layer lines material adds realism and material authenticity to digital assets used in product visualization level design and material studies.
To maximize realism when applying this tileable 3d printed pla layer lines texture it’s advisable to carefully adjust your UV scale to match the physical dimensions of the printed object ensuring the layer lines appear natural and consistent with real-world PLA prints. Fine-tuning the roughness map can also help tailor the surface reflectivity; lower roughness values will accentuate the subtle plastic sheen typical of polished PLA while higher values will produce a more diffuse matte finish reminiscent of unpolished prints. Additionally combining ambient occlusion and height/displacement maps enhances the perception of depth and surface complexity without oversharpening allowing the texture to maintain a balanced and realistic appearance under varied lighting conditions. This makes the texture highly versatile for use in both close-up shots and background elements delivering consistent visually compelling results across diverse 3D projects.
Import the texture maps into Blender with sRGB color space for albedo/base color and Non-Color for normal, roughness, metallic, AO, height, and ORM maps. Connect normal maps through a Normal Map node, then adjust UV scale with a Mapping node so the material repeats naturally on your model.
For the full step-by-step setup, see How to Use Seamless Textures in Blender. Browse related material examples in wood, concrete, and metal.
Yes. This texture is designed as a seamless tileable PBR material, so it can repeat across large surfaces without visible borders.
You can download PNG/WEBP versions and use 1K, 2K, 4K and 8K download options when available on the page.
Yes. The download options and engine-mapped ZIP workflow are designed for Blender, Unreal Engine, Unity Standard, URP and HDRP material pipelines.
Yes. The texture is available under the AITextured free commercial license. Review the license page for redistribution and AI-training restrictions.


Generate, preview, and export seamless PBR materials for Blender, Unity, and Unreal Engine—directly in your browser.
AI text-to-texture: type a prompt and get a seamless, tileable base image ready for PBR workflows (great starting point for materials).
Create a full PBR set (Normal, Roughness, AO, Metallic, etc.) from a single image. Seamless and tiling-friendly.
Instant WebGL viewer: inspect materials on a sphere, plane, and cube. Check tiling and lighting in real time.
Re-packages maps per engine: Unreal (BaseColor + ORM), Unity (Mask/MetallicSmoothness), Blender (separate channels).
PNG ↔ JPG ↔ SVG: fast convert, SVG rasterize, embed/trace options, quality & background controls.