
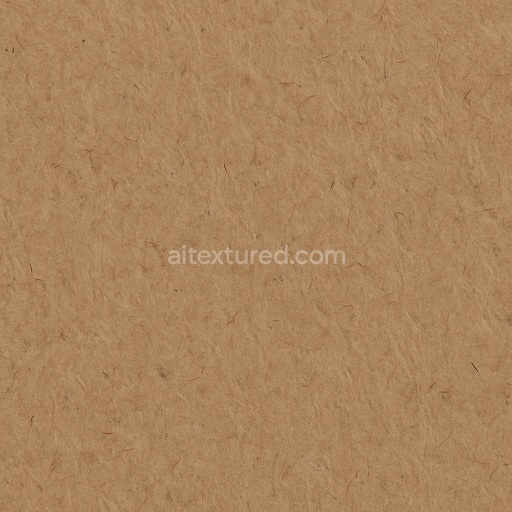
Featuring Cardboard Warp With Fiber Orientation And Surface Variation
Seamless texture (tileable) · PNG, WEBP, PBR ZIP. License: AITextured Free Commercial License (FCL) v1.1. Free personal and commercial use. Raw resale, standalone redistribution, mirroring/scraping, competing asset packs, and AI/ML training are not allowed without written permission. Attribution is not required, but appreciated..

| ID | seamless-3d-texture-pbr-8k-of-corrugated-cardboard-surface-with-natural-fiber-details |
|---|---|
| Category | Cardboard |
| Formats | PNG, WEBP, PBR ZIP |
| Size | 1k (1024x1024px), 2k (2048x2048px), 4k (4096x4096px), 8k (8192x8192px) |
| Color | sRGB |
| Tileable | Yes |
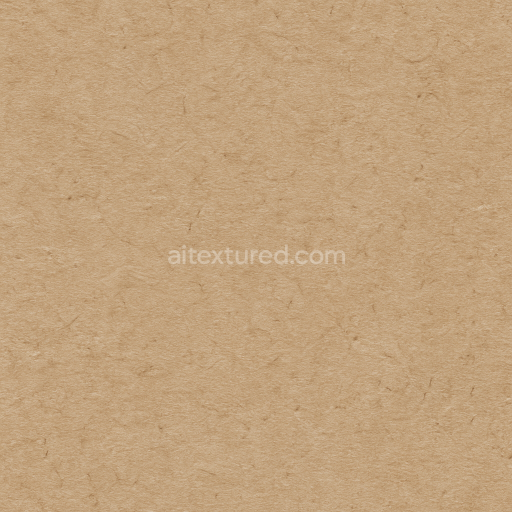
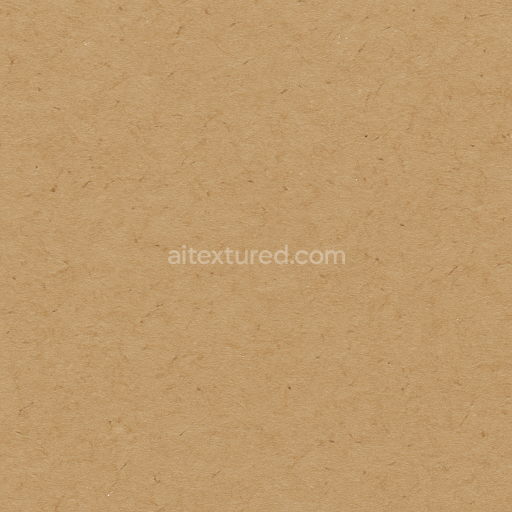
This seamless 3D PBR texture presents an ultra-high-definition 8K portrayal of corrugated cardboard highlighting its distinctive layered structure composed primarily of cellulose fibers derived from wood pulp. The surface reveals the characteristic form of parallel cardboard ridges formed by the fluted medium sandwiched between two flat linerboards. These ridges create a repetitive geometric pattern that provides both structural rigidity and visual depth with subtle undulations and natural variations in the fiber orientation. The cardboard grain is clearly visible showcasing intertwined cardboard pulp fibers that contribute to the material’s porous and fibrous appearance. The overall form emphasizes the raw untreated nature of the cardboard retaining its natural roughness and matte finish without any coating or lamination.
From a materials perspective the substrate consists chiefly of compressed cellulose fibers bonded by natural adhesives and resins producing a lightweight but firm texture with evident fibrous aggregates. The surface texture captures micro-level irregularities such as tiny fiber protrusions and slight surface porosity which influence the roughness and scattering of light. The color palette is a range of neutral browns and beiges reflecting the natural cardboard pulp pigments without artificial dyes or pigments. The roughness channel in this PBR map accurately represents the uneven surface finish with higher roughness values on fiber-rich areas and lower values on the smoother linerboard sections. The normal and height maps emphasize the relief of the ridges and the fine grain details while the ambient occlusion map enhances shadowing within the folds and fiber clusters providing realistic depth and material complexity. The metallic channel remains consistently low to zero as cardboard is a non-metallic organic material.
Designed for seamless tiling this texture maintains a uniform appearance across large surfaces without visible seams preserving the continuity of the cardboard ridges and fiber patterns. The displacement and height maps enable realistic parallax effects and accurate surface deformation in 3D environments. This texture is fully compatible and optimized for use in Blender Unreal Engine and Unity ensuring accurate rendering of the cardboard’s tactile qualities under varied lighting conditions. Its high resolution supports close-up inspection and detailed environment composition suitable for packaging visualization product prototyping or architectural mockups involving cardboard elements.
For practical application adjusting the UV scale to match real-world cardboard sheet dimensions will enhance realism preventing distortion of the corrugated form. Additionally fine-tuning the roughness map can simulate different weathering states—from fresh crisp cardboard with pronounced roughness to aged slightly smoother surfaces softened by wear. Blending the height and normal maps carefully will maximize the tactile feel without over-exaggerating surface bumps providing a balanced and believable cardboard material in your 3D projects.
Import the texture maps into Blender with sRGB color space for albedo/base color and Non-Color for normal, roughness, metallic, AO, height, and ORM maps. Connect normal maps through a Normal Map node, then adjust UV scale with a Mapping node so the material repeats naturally on your model.
For the full step-by-step setup, see How to Use Seamless Textures in Blender. Browse related material examples in wood, concrete, and metal.
Yes. This texture is designed as a seamless tileable PBR material, so it can repeat across large surfaces without visible borders.
You can download PNG/WEBP versions and use 1K, 2K, 4K and 8K download options when available on the page.
Yes. The download options and engine-mapped ZIP workflow are designed for Blender, Unreal Engine, Unity Standard, URP and HDRP material pipelines.
Yes. The texture is available under the AITextured free commercial license. Review the license page for redistribution and AI-training restrictions.


Generate, preview, and export seamless PBR materials for Blender, Unity, and Unreal Engine—directly in your browser.
AI text-to-texture: type a prompt and get a seamless, tileable base image ready for PBR workflows (great starting point for materials).
Create a full PBR set (Normal, Roughness, AO, Metallic, etc.) from a single image. Seamless and tiling-friendly.
Instant WebGL viewer: inspect materials on a sphere, plane, and cube. Check tiling and lighting in real time.
Re-packages maps per engine: Unreal (BaseColor + ORM), Unity (Mask/MetallicSmoothness), Blender (separate channels).
PNG ↔ JPG ↔ SVG: fast convert, SVG rasterize, embed/trace options, quality & background controls.