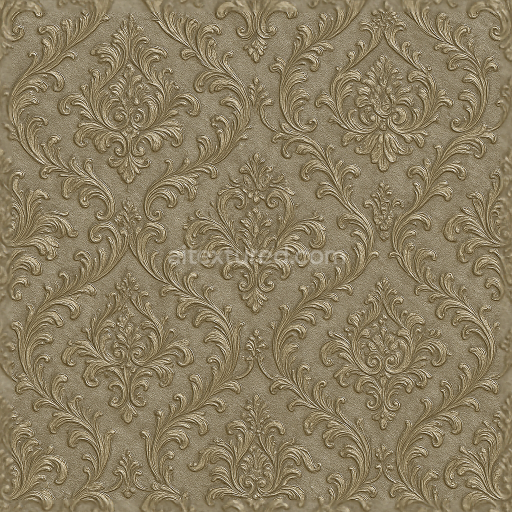
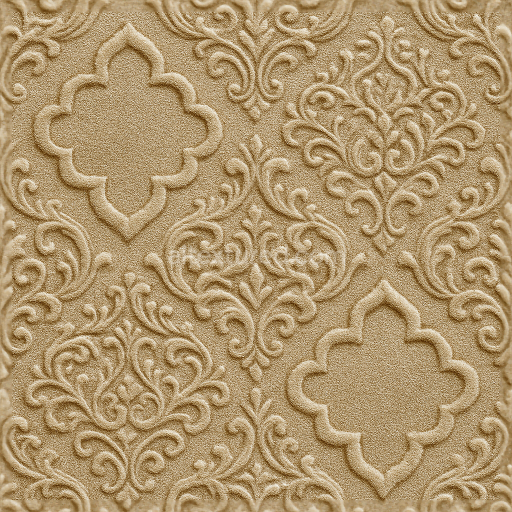
Baroque Ornate Wallpaper With Metallic Sheen
Seamless texture (tileable) · PNG, WEBP, PBR ZIP. License: AITextured Free Commercial License (FCL) v1.1. Free personal and commercial use. Raw resale, standalone redistribution, mirroring/scraping, competing asset packs, and AI/ML training are not allowed without written permission. Attribution is not required, but appreciated..

| ID | seamless-3d-texture-pbr-8k-floral-vines-wallpaper-with-hand-painted-style |
|---|---|
| Category | Wallpaper |
| Formats | PNG, WEBP, PBR ZIP |
| Size | 1k (1024x1024px), 2k (2048x2048px), 4k (4096x4096px), 8k (8192x8192px) |
| Color | sRGB |
| Tileable | Yes |
This seamless 3D wallpaper texture showcases a refined floral vines pattern meticulously crafted to emulate hand-painted artistry on a natural fiber substrate. The base material resembles a high-quality woven textile composed of fine cellulose fibers akin to traditional handcrafted wallpapers made from cotton or linen blends. This fiber-rich substrate provides a subtle tactile depth and a slightly irregular surface enhancing the authenticity of the organic vine motifs. The delicate intertwining vines and blossoms appear embossed with a gentle relief suggesting a low-profile raised pattern that interacts realistically with light. The texture’s form is defined by flowing vine tendrils and clustered blossoms creating a rhythmic repeating pattern that maintains visual continuity across extensive surfaces without discernible seams.
The composition integrates natural fiber aggregates bound by a matte cellulose-based adhesive layer that mimics handcrafted wallpaper paste. The surface finish is softly brushed with visible brush strokes and subtle textural imperfections reinforcing the hand-painted effect. Pigments are muted earth tones with soft greens dusty pinks and off-whites applied unevenly to replicate the slight color variations from hand application. This results in a porous yet refined surface where the slight roughness of fibers contrasts with the smoothness of painted areas. Weathering effects are minimal but suggest natural aging through faint tonal shifts and gentle surface wear enhancing the material’s realism and suitability for classic or vintage-inspired interiors.
In the PBR workflow the BaseColor (Albedo) channel captures the nuanced hand-painted color palette and fiber texture while the Normal map emphasizes the embossed vines and brushstroke relief creating convincing light interaction. The Roughness map reflects the matte fibrous surface with localized variations where paint layers are denser or thinner. The Metallic channel remains near zero consistent with organic non-metallic wallpaper materials. Ambient Occlusion enhances the subtle shadowing around vine embossments and fiber intersections adding depth. The Height/Displacement map defines the low-relief embossing of vines and floral motifs allowing for parallax or displacement effects in render engines further enhancing the tactile quality.
Rendered at an 8K resolution this texture is optimized for high-fidelity visualization in Blender Unreal Engine and Unity ensuring crisp detail even on large-scale wall surfaces. When applying this texture it is advisable to carefully adjust the UV scale to maintain the natural proportions of the floral pattern and avoid distortion. For enhanced realism fine-tuning the Roughness map can help balance the interplay between the matte fibers and the subtly glossy painted areas. Additionally blending the Height and Normal maps thoughtfully can enrich the embossed effect without exaggerating displacement artifacts preserving the delicate hand-crafted aesthetic in both real-time and offline rendering workflows.
Import the texture maps into Blender with sRGB color space for albedo/base color and Non-Color for normal, roughness, metallic, AO, height, and ORM maps. Connect normal maps through a Normal Map node, then adjust UV scale with a Mapping node so the material repeats naturally on your model.
For the full step-by-step setup, see How to Use Seamless Textures in Blender. Browse related material examples in wood, concrete, and metal.
Yes. This texture is designed as a seamless tileable PBR material, so it can repeat across large surfaces without visible borders.
You can download PNG/WEBP versions and use 1K, 2K, 4K and 8K download options when available on the page.
Yes. The download options and engine-mapped ZIP workflow are designed for Blender, Unreal Engine, Unity Standard, URP and HDRP material pipelines.
Yes. The texture is available under the AITextured free commercial license. Review the license page for redistribution and AI-training restrictions.


Generate, preview, and export seamless PBR materials for Blender, Unity, and Unreal Engine—directly in your browser.
AI text-to-texture: type a prompt and get a seamless, tileable base image ready for PBR workflows (great starting point for materials).
Create a full PBR set (Normal, Roughness, AO, Metallic, etc.) from a single image. Seamless and tiling-friendly.
Instant WebGL viewer: inspect materials on a sphere, plane, and cube. Check tiling and lighting in real time.
Re-packages maps per engine: Unreal (BaseColor + ORM), Unity (Mask/MetallicSmoothness), Blender (separate channels).
PNG ↔ JPG ↔ SVG: fast convert, SVG rasterize, embed/trace options, quality & background controls.