
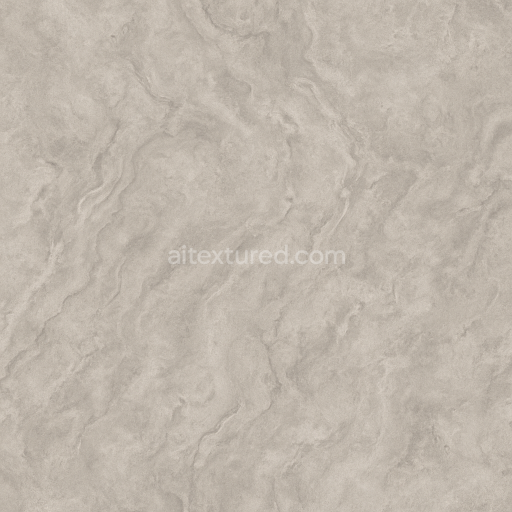
Square Tiled Wall - Wall Tiles Albedo Normal Roughness
Seamless texture (tileable) · PNG, WEBP, PBR ZIP. License: AITextured Free Commercial License (FCL) v1.1. Free personal and commercial use. Raw resale, standalone redistribution, mirroring/scraping, competing asset packs, and AI/ML training are not allowed without written permission. Attribution is not required, but appreciated..

| ID | seamless-3d-texture-pbr-8k-wallpaper-with-rustic-wood-grain-and-roughcast-plaster-finish |
|---|---|
| Category | Wallpaper |
| Formats | PNG, WEBP, PBR ZIP |
| Size | 1k (1024x1024px), 2k (2048x2048px), 4k (4096x4096px), 8k (8192x8192px) |
| Color | sRGB |
| Tileable | Yes |
This seamless 3D texture wallpaper combines the organic character of rustic wood grain with a coarse roughcast plaster finish creating a richly detailed surface ideal for both rustic and industrial interior designs. The base material is primarily aged hardwood planks showcasing pronounced grain patterns and natural weathering effects such as cracks knots and subtle surface irregularities. These wooden elements form the underlying geometric pattern arranged in horizontal planks with visible seams and slight relief variations that emphasize depth and tactile realism. Overlaid on this wood substrate is a roughcast plaster layer characterized by uneven aggregates and a porous matte surface that contrasts with the smoother wood beneath. The plaster’s coarse texture includes fine mineral grains and tiny air pockets contributing to its diffuse scattering properties and enhancing the visual complexity of the wallpaper.
The composition of this texture involves a wooden plank substrate bound by natural lignin and cellulose fibers giving the base its structural rigidity and fibrous grain. The roughcast plaster layer consists of a mineral-rich binder such as lime or cement mixed with sand and small stone aggregates creating a rugged uneven finish. The plaster’s porosity and micro-roughness result from the aggregate size distribution and the application technique which leaves a slightly abrasive surface texture. Colorants are naturally derived with warm brown and ochre tones in the wood contrasting against the neutral gray-beige plaster both captured in the BaseColor (Albedo) channel. The Normal map encodes the fine surface details of the wood grain and plaster roughness while the Height/Displacement map accentuates the relief of the planks and the uneven plaster aggregates enhancing depth perception under dynamic lighting.
Roughness values vary across the texture with the plaster exhibiting high roughness due to its matte porous nature and the wood grain showing moderate roughness that reflects subtle specular highlights from varnished or worn surfaces. The Metallic channel remains near zero as both wood and plaster are non-metallic materials. Ambient Occlusion maps are used to emphasize shadows within the wood grain crevices and the uneven plaster surface increasing realism by simulating soft occlusion in recessed areas. The final texture is rendered at an 8K resolution capturing intricate micro-details and ensuring crisp visuals even in close-up views making it fully compatible and optimized for use in Blender Unreal Engine and Unity workflows.
For practical application it is recommended to carefully adjust UV scaling to maintain the natural size of the wood planks and plaster aggregates avoiding distortion or repetition artifacts. Additionally fine-tuning the roughness channel can help adapt the texture to different lighting conditions or stylistic preferences while blending height and normal maps allows for enhanced parallax effects that bring out the tactile qualities of both materials. This texture is well-suited for virtual environments requiring photorealistic wall surfaces with a rustic-industrial aesthetic providing both visual depth and material authenticity.
Import the texture maps into Blender with sRGB color space for albedo/base color and Non-Color for normal, roughness, metallic, AO, height, and ORM maps. Connect normal maps through a Normal Map node, then adjust UV scale with a Mapping node so the material repeats naturally on your model.
For the full step-by-step setup, see How to Use Seamless Textures in Blender. Browse related material examples in wood, concrete, and metal.
Yes. This texture is designed as a seamless tileable PBR material, so it can repeat across large surfaces without visible borders.
You can download PNG/WEBP versions and use 1K, 2K, 4K and 8K download options when available on the page.
Yes. The download options and engine-mapped ZIP workflow are designed for Blender, Unreal Engine, Unity Standard, URP and HDRP material pipelines.
Yes. The texture is available under the AITextured free commercial license. Review the license page for redistribution and AI-training restrictions.


Generate, preview, and export seamless PBR materials for Blender, Unity, and Unreal Engine—directly in your browser.
AI text-to-texture: type a prompt and get a seamless, tileable base image ready for PBR workflows (great starting point for materials).
Create a full PBR set (Normal, Roughness, AO, Metallic, etc.) from a single image. Seamless and tiling-friendly.
Instant WebGL viewer: inspect materials on a sphere, plane, and cube. Check tiling and lighting in real time.
Re-packages maps per engine: Unreal (BaseColor + ORM), Unity (Mask/MetallicSmoothness), Blender (separate channels).
PNG ↔ JPG ↔ SVG: fast convert, SVG rasterize, embed/trace options, quality & background controls.