
Festive Stripes Holiday Sparkle Ribbon Curl
Seamless texture (tileable) · PNG, WEBP, PBR ZIP. License: AITextured Free Commercial License (FCL) v1.1. Free personal and commercial use. Raw resale, standalone redistribution, mirroring/scraping, competing asset packs, and AI/ML training are not allowed without written permission. Attribution is not required, but appreciated..

| ID | seamless-3d-texture-pbr-8k-star-ornament-christmas-card-festive-bow-metal-bell-twinkling-lights |
|---|---|
| Category | Merry christmas |
| Formats | PNG, WEBP, PBR ZIP |
| Size | 1k (1024x1024px), 2k (2048x2048px), 4k (4096x4096px), 8k (8192x8192px) |
| Color | sRGB |
| Tileable | Yes |
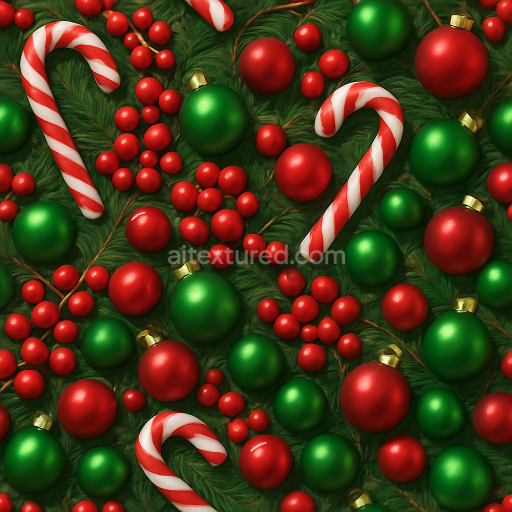
This seamless 3D texture presents a meticulously crafted arrangement of star-shaped ornaments traditional Christmas cards festive bows and shiny metal bells all illuminated by softly glowing twinkling lights. The base materials predominantly simulate a combination of polished metals textured paper and delicate fabric. The star ornaments and metal bells exhibit a reflective brushed metal surface with subtle oxidation and wear rendered through the Metallic and Roughness channels to convey a realistic interplay of light and shadow. The Christmas cards are represented by a fibrous paper substrate enhanced with fine grain and slight embossing to mimic the tactile feel of cardstock captured via height and normal maps that emphasize surface detail without disrupting the seamless pattern flow.
The festive bows appear as woven fabric elements likely satin or velvet characterized by a smooth yet slightly textured surface finish. This is achieved by controlling roughness values to balance sheen and softness while ambient occlusion maps enhance the depth around folds and creases adding dimensionality. Colorants in this texture vary from warm reds and greens of the bows and cards to the cool silvers and golds of the metal components all accurately represented in the BaseColor channel. The height map subtly accentuates the embossed features on the cards and the layered composition of the bows contributing to a convincing tactile sensation suitable for close-up renders.
Structurally the texture features a repeating geometric layout where star ornaments and bells intersperse with rectangular card forms and bow shapes creating a harmonious pattern ideal for wrapping paper holiday-themed 3D models or environment decoration. Porosity is minimal on the metallic surfaces but noticeable on paper and fabric suggesting a slight roughness and microscopic surface variation that enhances realism. Weathering effects are gentle maintaining a festive clean appearance while preventing flatness through nuanced shading captured in the ambient occlusion and normal maps.
Designed at an impressive 8K resolution this PBR texture is optimized for use in Blender Unreal Engine and Unity ensuring high fidelity and flexibility across various rendering pipelines. The texture’s detailed normal and height maps facilitate advanced displacement and parallax effects enabling artists to add pronounced depth without sacrificing performance. For practical application it’s recommended to adjust the UV scale carefully to preserve the detail of small elements like twinkling lights and metal reflections and to fine-tune roughness parameters depending on lighting conditions to achieve the desired balance between glossiness and matte finishes.
Import the texture maps into Blender with sRGB color space for albedo/base color and Non-Color for normal, roughness, metallic, AO, height, and ORM maps. Connect normal maps through a Normal Map node, then adjust UV scale with a Mapping node so the material repeats naturally on your model.
For the full step-by-step setup, see How to Use Seamless Textures in Blender. Browse related material examples in wood, concrete, and metal.
Yes. This texture is designed as a seamless tileable PBR material, so it can repeat across large surfaces without visible borders.
You can download PNG/WEBP versions and use 1K, 2K, 4K and 8K download options when available on the page.
Yes. The download options and engine-mapped ZIP workflow are designed for Blender, Unreal Engine, Unity Standard, URP and HDRP material pipelines.
Yes. The texture is available under the AITextured free commercial license. Review the license page for redistribution and AI-training restrictions.


Build, preview, and export seamless PBR materials. Generate full map sets from a single image, inspect them in a real-time WebGL viewer, and re-package maps for Unreal, Unity, and Blender—directly in your browser.
AI text-to-texture: type a prompt and get a seamless, tileable base image ready for PBR workflows (great starting point for materials).
Create a full PBR set (Normal, Roughness, AO, Metallic, etc.) from a single image. Seamless and tiling-friendly.
Instant WebGL viewer: inspect materials on a sphere, plane, and cube. Check tiling and lighting in real time.
Re-packages maps per engine: Unreal (BaseColor + ORM), Unity (Mask/MetallicSmoothness), Blender (separate channels).
PNG ↔ JPG ↔ SVG: fast convert, SVG rasterize, embed/trace options, quality & background controls.