
Slick Skin Smooth Hide Thick Skin Leathery Skin Glossy Skin Reptile Skin Scaly Skin
Seamless texture (tileable) · PNG, WEBP, PBR ZIP. License: AITextured Free Commercial License (FCL) v1.1. Free personal and commercial use. Raw resale, standalone redistribution, mirroring/scraping, competing asset packs, and AI/ML training are not allowed without written permission. Attribution is not required, but appreciated..

| ID | seamless-3d-texture-pbr-8k-leathery-skin-wrinkled-skin-thick-skin-cracked-skin-rough-hide-pitted-skin |
|---|---|
| Category | Animal skin |
| Formats | PNG, WEBP, PBR ZIP |
| Size | 1k (1024x1024px), 2k (2048x2048px), 4k (4096x4096px), 8k (8192x8192px) |
| Color | sRGB |
| Tileable | Yes |
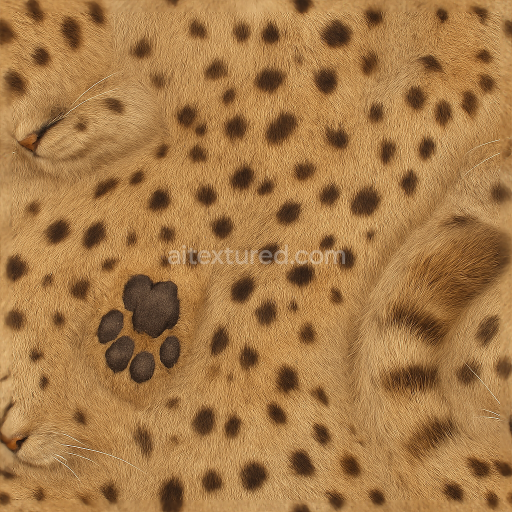
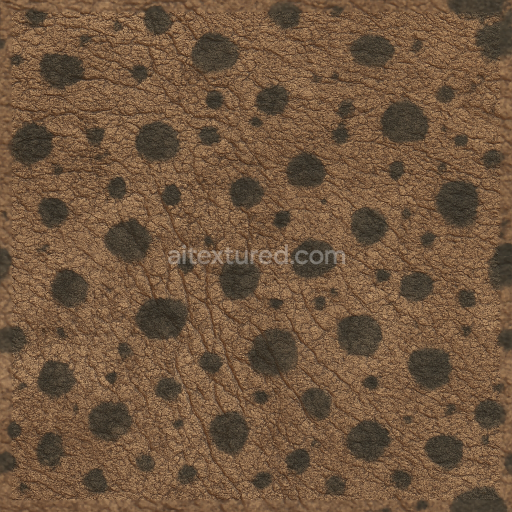
This seamless 8K PBR texture presents a detailed representation of thick, leathery animal skin characterized by pronounced wrinkles, deep cracks, and a rough, pitted hide. The base material closely mimics a dense dermal substrate composed of tightly interwoven collagen fibers, providing structural rigidity and natural flexibility. The surface complexity arises from layered skin folds and weathered imperfections, creating a rugged geometric pattern that resembles organic tessellations formed through aging and environmental exposure. This results in a tactile form with varied porosity and subtle depressions distributed unevenly, enhancing the realism of the texture’s ruggedness and thickness.
The composition of the skin texture reflects natural biological elements: the substrate simulates collagenous fibers bound by elastin-like proteins, which contribute to the thick and resilient feel. Surface aggregates include fine grain-like pitting and cracked crevices, emulating the wear and tear seen in aged animal hides or reptilian skins. The finish is matte with low specularity, emphasizing a rough, non-reflective surface that absorbs light diffusely. Coloration is derived from natural pigments—earthy browns, muted tans, and subtle greys—distributed irregularly to reinforce the organic appearance. These colorants correspond directly to the BaseColor (Albedo) channel in PBR workflows, delivering realistic diffuse shading across all lighting conditions.
Technically, the Normal map captures the intricate relief of wrinkles, cracks, and pits, creating pronounced surface detail that reacts dynamically to lighting in real time. The Roughness map is finely tuned to represent varying degrees of surface friction, with elevated roughness on cracked and pitted areas contrasted by slightly smoother skin folds, enhancing the perception of depth and material variation. The Metallic channel remains near zero, consistent with non-metallic organic tissue, while the Ambient Occlusion map accentuates shadowed crevices and folds to boost depth perception. The Height (Displacement) map adds geometric realism by enabling subtle parallax effects or tessellation, crucial for close-up renders that demand high fidelity.
Optimized for Blender, Unreal Engine, and Unity, this texture is designed to tile seamlessly without visible repetition, supporting high-quality photorealistic rendering workflows. The 8K resolution ensures that even the finest skin micro-details are preserved, allowing for detailed close-ups and large-scale applications alike. For practical use, it is advisable to adjust UV scaling carefully to maintain natural wrinkle proportions and avoid distortion. Additionally, blending height and normal maps with subtle roughness variations can enhance realism by simulating wear patterns and differential aging across the skin surface.
Import the texture maps into Blender with sRGB color space for albedo/base color and Non-Color for normal, roughness, metallic, AO, height, and ORM maps. Connect normal maps through a Normal Map node, then adjust UV scale with a Mapping node so the material repeats naturally on your model.
For the full step-by-step setup, see How to Use Seamless Textures in Blender. Browse related material examples in wood, concrete, and metal.
Yes. This texture is designed as a seamless tileable PBR material, so it can repeat across large surfaces without visible borders.
You can download PNG/WEBP versions and use 1K, 2K, 4K and 8K download options when available on the page.
Yes. The download options and engine-mapped ZIP workflow are designed for Blender, Unreal Engine, Unity Standard, URP and HDRP material pipelines.
Yes. The texture is available under the AITextured free commercial license. Review the license page for redistribution and AI-training restrictions.


Build, preview, and export seamless PBR materials. Generate full map sets from a single image, inspect them in a real-time WebGL viewer, and re-package maps for Unreal, Unity, and Blender—directly in your browser.
AI text-to-texture: type a prompt and get a seamless, tileable base image ready for PBR workflows (great starting point for materials).
Create a full PBR set (Normal, Roughness, AO, Metallic, etc.) from a single image. Seamless and tiling-friendly.
Instant WebGL viewer: inspect materials on a sphere, plane, and cube. Check tiling and lighting in real time.
Re-packages maps per engine: Unreal (BaseColor + ORM), Unity (Mask/MetallicSmoothness), Blender (separate channels).
PNG ↔ JPG ↔ SVG: fast convert, SVG rasterize, embed/trace options, quality & background controls.