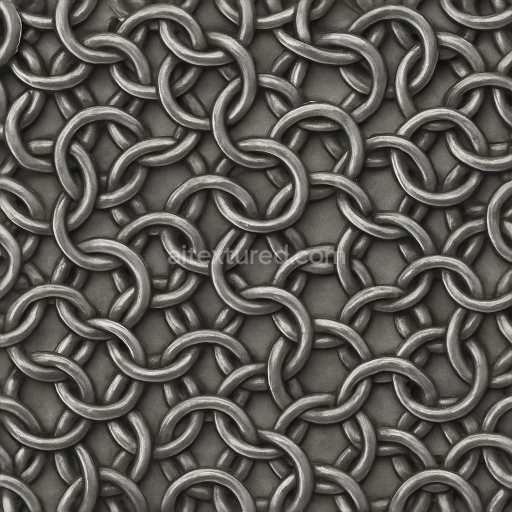
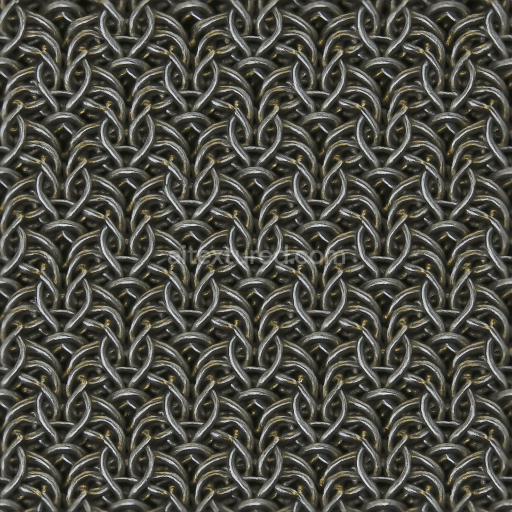
8K PBR Chainmail With Persian Weave And Polished Metal Finish
Seamless texture (tileable) · PNG, WEBP, PBR ZIP. License: AITextured Free Commercial License (FCL) v1.1. Free personal and commercial use. Raw resale, standalone redistribution, mirroring/scraping, competing asset packs, and AI/ML training are not allowed without written permission. Attribution is not required, but appreciated..

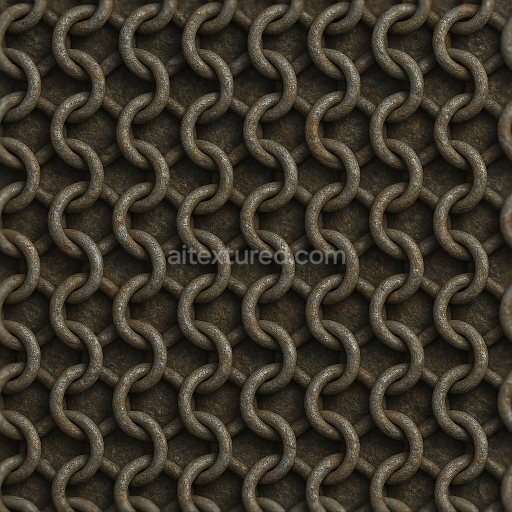
| ID | seamless-3d-texture-8k-pbr-chainmail-with-rusted-rings-and-oxidation-spots-detail |
|---|---|
| Category | Chainmail |
| Formats | PNG, WEBP, PBR ZIP |
| Size | 1k (1024x1024px), 2k (2048x2048px), 4k (4096x4096px), 8k (8192x8192px) |
| Color | sRGB |
| Tileable | Yes |
This seamless 3D texture presents an incredibly detailed photorealistic chainmail surface crafted entirely from interlinked metal rings showcasing advanced PBR materials at an impressive 8K resolution. The base substrate consists of tightly woven steel rings that exhibit natural oxidation and rusted rings with multi-tone patinas ranging from deep oranges and browns to subtle greenish oxidation spots. These color variations derive from iron oxide layers and corrosion pigments accumulated over time creating a weathered and authentic aged metal appearance. The surface finish combines oxidized and lightly abraded metal with visible scratches deformation and subtle ring misalignment that contribute to the realistic distressed look. The porosity and surface roughness reflect years of environmental exposure enhancing the tactile feel of the texture.
In terms of PBR channel mapping the BaseColor/Albedo map captures the nuanced rust coloration and detailed oxidation spots while the Normal map emphasizes the intricate ring structure including the subtle abrasions and deformations that add depth and realism. The Roughness channel varies across the texture presenting a natural balance between matte oxidized areas and glossier metal patches where abrasion has worn down the rust. The Metallic map highlights the underlying steel composition of the rings maintaining high metalness but tempered by rust and corrosion effects. Ambient Occlusion provides realistic shadowing within the tightly interlinked rings enhancing the perception of depth and overlap. Meanwhile the Height/Displacement map accentuates the raised edges of the rings and the uneven surface caused by corrosion and wear perfect for advanced parallax or tessellation effects.
Designed to integrate seamlessly into workflows this 8K seamless 3D PBR chainmail texture is fully optimized and ready for use in Blender Unreal Engine and Unity projects. It is ideal for historical armor recreations post-apocalyptic environments or any scenario requiring a truly authentic distressed metal surface with convincing environmental wear. For practical implementation adjusting the UV scale to maintain the natural size of the rings and fine-tuning the roughness map can significantly enhance realism allowing you to control the balance between shiny metal highlights and matte rusted surfaces. Additionally leveraging the height map with parallax occlusion mapping can bring extra dimensionality to your models making the chainmail appear more tactile and immersive under dynamic lighting conditions.
Import the texture maps into Blender with sRGB color space for albedo/base color and Non-Color for normal, roughness, metallic, AO, height, and ORM maps. Connect normal maps through a Normal Map node, then adjust UV scale with a Mapping node so the material repeats naturally on your model.
For the full step-by-step setup, see How to Use Seamless Textures in Blender. Browse related material examples in wood, concrete, and metal.
Yes. This texture is designed as a seamless tileable PBR material, so it can repeat across large surfaces without visible borders.
You can download PNG/WEBP versions and use 1K, 2K, 4K and 8K download options when available on the page.
Yes. The download options and engine-mapped ZIP workflow are designed for Blender, Unreal Engine, Unity Standard, URP and HDRP material pipelines.
Yes. The texture is available under the AITextured free commercial license. Review the license page for redistribution and AI-training restrictions.
Build, preview, and export seamless PBR materials. Generate full map sets from a single image, inspect them in a real-time WebGL viewer, and re-package maps for Unreal, Unity, and Blender—directly in your browser.
AI text-to-texture: type a prompt and get a seamless, tileable base image ready for PBR workflows (great starting point for materials).
Create a full PBR set (Normal, Roughness, AO, Metallic, etc.) from a single image. Seamless and tiling-friendly.
Instant WebGL viewer: inspect materials on a sphere, plane, and cube. Check tiling and lighting in real time.
Re-packages maps per engine: Unreal (BaseColor + ORM), Unity (Mask/MetallicSmoothness), Blender (separate channels).
PNG ↔ JPG ↔ SVG: fast convert, SVG rasterize, embed/trace options, quality & background controls.