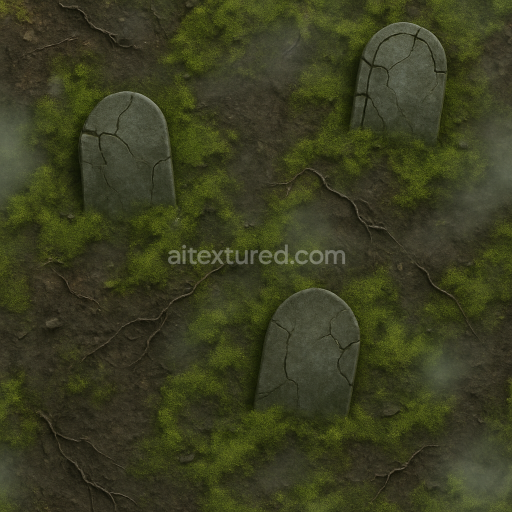
Graveyard Soil With Moss Green And Foggy Mist Accents
Seamless texture (tileable) · PNG, WEBP, PBR ZIP. License: AITextured Free Commercial License (FCL) v1.1. Free personal and commercial use. Raw resale, standalone redistribution, mirroring/scraping, competing asset packs, and AI/ML training are not allowed without written permission. Attribution is not required, but appreciated..

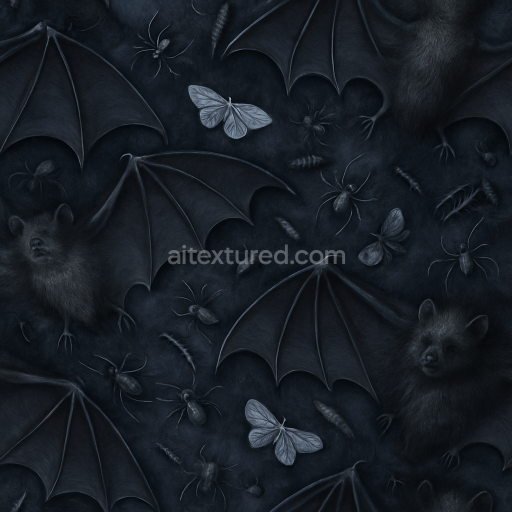
| ID | seamless-3d-texture-pbr-8k-bat-fur-and-owl-feathers-for-dark-halloween-creatures |
|---|---|
| Category | Halloween |
| Formats | PNG, WEBP, PBR ZIP |
| Size | 1k (1024x1024px), 2k (2048x2048px), 4k (4096x4096px), 8k (8192x8192px) |
| Color | sRGB |
| Tileable | Yes |
This seamless 3D texture masterfully integrates the intricate organic composition of bat fur and owl feathers captured at an impressive 8K resolution with physically based rendering (PBR) for photorealistic detail. The base substrate mimics natural animal fibers—soft fine keratin strands interwoven with delicate feather vanes—carefully simulated to reflect their unique microstructures. Pigments inspired by shadow black and twilight blue hues create a rich dark palette characteristic of nocturnal creatures with subtle variations that evoke natural pigment dispersion and light absorption. The texture’s surface finish balances a soft matte with gentle specular highlights replicating the natural sheen of fur and the slight iridescence of feathers without excessive glossiness ensuring realistic light interaction in digital environments.
In terms of material channels the BaseColor/Albedo map captures the nuanced color gradients from deep blacks to muted blues closely resembling the natural dyes found in bat and owl pelage. The Normal map emphasizes the fine fiber orientation and feather vane patterns adding depth and tactile realism by simulating microscopic ridges and fur strands. Roughness is finely tuned to reflect the semi-matte surface finish where fur softness contrasts with the slight stiffness of feathers offering a subtle variance that enhances realism. The Metallic channel remains minimal to nonexistent consistent with organic materials while Ambient Occlusion enhances shadowing between fur clumps and feather layers deepening perception of volume. Height/Displacement maps provide delicate surface irregularities that amplify parallax effects aiding in the convincing portrayal of layered fur and feather structures.
Designed for seamless tiling this texture is optimized for high-end game engines such as Unreal Engine Blender and Unity ensuring straightforward integration into dark fantasy and Halloween-themed models. Its neutral lighting setup allows for flexible adaptation to various scene conditions while maintaining naturalistic fidelity. For best results adjust the UV scale to emphasize fine fiber details without visible repetition and consider fine-tuning the roughness map to balance light reflection depending on environmental context. The high resolution and meticulous PBR channel setup make this texture an ideal choice for artists seeking to create immersive nocturnal creatures or atmospheric digital assets with authentic animal surface qualities.
Import the texture maps into Blender with sRGB color space for albedo/base color and Non-Color for normal, roughness, metallic, AO, height, and ORM maps. Connect normal maps through a Normal Map node, then adjust UV scale with a Mapping node so the material repeats naturally on your model.
For the full step-by-step setup, see How to Use Seamless Textures in Blender. Browse related material examples in wood, concrete, and metal.
Yes. This texture is designed as a seamless tileable PBR material, so it can repeat across large surfaces without visible borders.
You can download PNG/WEBP versions and use 1K, 2K, 4K and 8K download options when available on the page.
Yes. The download options and engine-mapped ZIP workflow are designed for Blender, Unreal Engine, Unity Standard, URP and HDRP material pipelines.
Yes. The texture is available under the AITextured free commercial license. Review the license page for redistribution and AI-training restrictions.
Build, preview, and export seamless PBR materials. Generate full map sets from a single image, inspect them in a real-time WebGL viewer, and re-package maps for Unreal, Unity, and Blender—directly in your browser.
AI text-to-texture: type a prompt and get a seamless, tileable base image ready for PBR workflows (great starting point for materials).
Create a full PBR set (Normal, Roughness, AO, Metallic, etc.) from a single image. Seamless and tiling-friendly.
Instant WebGL viewer: inspect materials on a sphere, plane, and cube. Check tiling and lighting in real time.
Re-packages maps per engine: Unreal (BaseColor + ORM), Unity (Mask/MetallicSmoothness), Blender (separate channels).
PNG ↔ JPG ↔ SVG: fast convert, SVG rasterize, embed/trace options, quality & background controls.