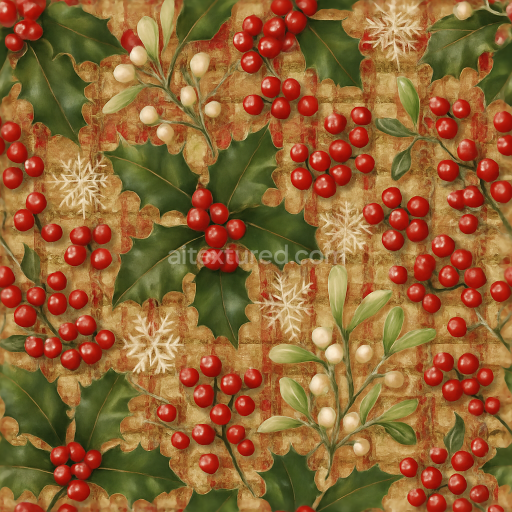
Holly Leaves Holly Berries Mistletoe Red Berries
Seamless texture (tileable) · PNG, WEBP, PBR ZIP. License: AITextured Free Commercial License (FCL) v1.1. Free personal and commercial use. Raw resale, standalone redistribution, mirroring/scraping, competing asset packs, and AI/ML training are not allowed without written permission. Attribution is not required, but appreciated..

| ID | seamless-3d-texture-pbr-8k-pine-bark-birch-bark-wrapping-twine-natural-twine-wooden-toy |
|---|---|
| Category | Merry christmas |
| Formats | PNG, WEBP, PBR ZIP |
| Size | 1k (1024x1024px), 2k (2048x2048px), 4k (4096x4096px), 8k (8192x8192px) |
| Color | sRGB |
| Tileable | Yes |
This seamless 3D texture presents a richly detailed combination of pine bark and birch bark surfaces intertwined with natural wrapping twine and wooden toy elements. The base materials are primarily organic wood substrates: pine bark exhibiting coarse rugged fissures and layered scales while birch bark contributes smoother papery sheets with subtle peeling and horizontal lenticel patterns. These natural fibers and grains create a complex tactile surface characterized by irregular cracks fissures and fibrous strands. The wrapping twine is composed of tightly twisted natural fibers such as jute or hemp providing a fibrous woven texture that contrasts with the rigid bark forms. The wooden toy surfaces add smooth gently curved planes with fine grain patterns and occasional tool marks suggesting handcrafted quality. Together these elements form a laminated multi-material composition with varied porosity and weathering from rough bark to polished wood.*
In terms of surface finish the bark areas display a matte weathered appearance with subtle roughness variations due to natural wear and environmental exposure. The twine fibers have a slightly fibrous matte finish with visible strands and occasional fraying while the wooden toy surfaces exhibit a softly brushed low-sheen finish that enhances the natural wood grain without glossiness. Pigmentation arises from organic colorants inherent to the materials: warm browns and greys dominate the pine bark creamy white and light tan shades characterize the birch bark and muted beige tones define the twine. The wooden toy surfaces show warm honey and caramel hues emphasizing their handcrafted feel. These color details are accurately captured in the BaseColor (Albedo) map.*
The PBR channels are meticulously crafted to reflect these material properties in photorealistic rendering. The Normal map captures the intricate relief of bark ridges twine fibers and wood grain enhancing depth and tactile realism. The Roughness map varies across materials with higher roughness on bark and twine to emphasize their coarse texture and moderately lower roughness on wooden toy surfaces for a subtle soft sheen. The Metallic map remains near zero throughout consistent with non-metallic organic materials. Ambient Occlusion enhances shadowed crevices in bark fissures and twine overlaps adding dimensionality. The Height (Displacement) map encodes fine relief differences supporting parallax or displacement techniques for enhanced surface depth.*
Rendered at an 8K resolution this texture offers exceptional detail suitable for high-fidelity projects in Blender Unreal Engine and Unity. Its seamless tiling capability ensures continuous artifact-free coverage on large surfaces or complex 3D models ideal for creating authentic rustic holiday scenes or natural product visualizations. For optimal results it is recommended to carefully adjust UV scaling to maintain natural bark and twine proportions and to fine-tune roughness values to balance highlights and shadows realistically. When using displacement or parallax mapping blending height and normal maps can improve depth perception without excessive geometry preserving performance while enhancing detail fidelity. This texture’s versatility and material accuracy make it a valuable resource for realistic environmental and prop texturing.*
Import the texture maps into Blender with sRGB color space for albedo/base color and Non-Color for normal, roughness, metallic, AO, height, and ORM maps. Connect normal maps through a Normal Map node, then adjust UV scale with a Mapping node so the material repeats naturally on your model.
For the full step-by-step setup, see How to Use Seamless Textures in Blender. Browse related material examples in wood, concrete, and metal.
Yes. This texture is designed as a seamless tileable PBR material, so it can repeat across large surfaces without visible borders.
You can download PNG/WEBP versions and use 1K, 2K, 4K and 8K download options when available on the page.
Yes. The download options and engine-mapped ZIP workflow are designed for Blender, Unreal Engine, Unity Standard, URP and HDRP material pipelines.
Yes. The texture is available under the AITextured free commercial license. Review the license page for redistribution and AI-training restrictions.


Build, preview, and export seamless PBR materials. Generate full map sets from a single image, inspect them in a real-time WebGL viewer, and re-package maps for Unreal, Unity, and Blender—directly in your browser.
AI text-to-texture: type a prompt and get a seamless, tileable base image ready for PBR workflows (great starting point for materials).
Create a full PBR set (Normal, Roughness, AO, Metallic, etc.) from a single image. Seamless and tiling-friendly.
Instant WebGL viewer: inspect materials on a sphere, plane, and cube. Check tiling and lighting in real time.
Re-packages maps per engine: Unreal (BaseColor + ORM), Unity (Mask/MetallicSmoothness), Blender (separate channels).
PNG ↔ JPG ↔ SVG: fast convert, SVG rasterize, embed/trace options, quality & background controls.