
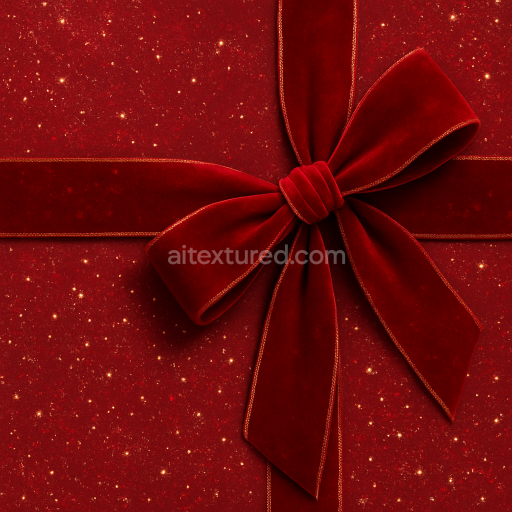
Seamless 8K PBR 3D Texture of Plush Velvet Holiday Fabric with Rich Red Tone
Seamless texture (tileable) · PNG, WEBP, PBR ZIP. License: AITextured Free Commercial License (FCL) v1.1. Free personal and commercial use. Raw resale, standalone redistribution, mirroring/scraping, competing asset packs, and AI/ML training are not allowed without written permission. Attribution is not required, but appreciated..

| ID | seamless-3d-texture-pbr-8k-christmas-lights-wire-twinkling-lights-twinkling-star-gold-star-shiny-ornament |
|---|---|
| Category | Merry christmas |
| Formats | PNG, WEBP, PBR ZIP |
| Size | 1k (1024x1024px), 2k (2048x2048px), 4k (4096x4096px), 8k (8192x8192px) |
| Color | sRGB |
| Tileable | Yes |
This seamless 3D texture captures the intricate details of Christmas lights wire intertwined with twinkling star-shaped ornaments and shiny gold baubles rendered at an impressive 8K resolution. The base material primarily consists of fine gauge copper wire coated with a smooth translucent polymer insulation that provides both electrical safety and subtle gloss. Wrapped around this wire are miniature glass bulbs shaped as stars and traditional round ornaments each exhibiting a highly polished surface finish that reflects ambient light realistically. The glass baubles are enriched with metallic gold pigments giving them a luminous reflective quality that contrasts elegantly with the warm glow emitted by the tiny LED filaments inside. The composition evokes a festive plaid-like arrangement of lights and ornaments creating a repeating pattern that is both organic in form yet seamless in its tiling capabilities.
The texture’s substrate is modeled to reflect the physical layering of materials: the copper wire’s metallic base is defined with a low roughness and high metallic value in the PBR workflow while the polymer coating introduces a slightly higher roughness to diffuse highlights softly. The glass ornaments incorporate highly reflective smooth surfaces with minimal roughness alongside subtle normal map details that simulate tiny imperfections and curvature enhancing their realism. The twinkling stars incorporate emissive properties mapped to specific regions simulating the light emission of LEDs while subtle height and displacement maps add depth by emphasizing the wire’s twist and the ornaments’ rounded geometry. Ambient occlusion is carefully applied to convey natural shadows where wires overlap or ornaments connect increasing the perception of depth and spatial complexity.
The BaseColor channel features a rich palette of warm metallic golds translucent glass blues and festive reds achieved through carefully calibrated pigments that maintain vibrancy under various lighting conditions. The Normal map accentuates the fine details of the wire’s braided texture and the embossed star patterns on the ornaments while the Roughness map varies dynamically to represent the contrast between the shiny smooth surfaces of the glass baubles and the matte finish of the polymer-coated wire. The Metallic channel highlights the copper wire and gold stars ensuring realistic light interaction typical of metallic objects. Height maps contribute subtle relief enhancing tactile realism in close-up renders especially beneficial for high-fidelity scenes.
Designed for seamless tiling this texture is optimized for use in Blender Unreal Engine and Unity supporting physically based rendering workflows that require precise material definitions. When applying this texture adjusting the UV scale to maintain the delicate balance between wire thickness and ornament size is recommended to preserve visual clarity. Additionally fine-tuning the roughness values can help simulate different lighting environments—lower roughness for bright indoor holiday scenes to increase reflectivity or higher roughness for outdoor diffused lighting conditions. Incorporating normal and height map blending can further enhance the three-dimensional feel of the wire and ornament surfaces making this texture a versatile asset for immersive festive visualizations and digital decoration projects.
Import the texture maps into Blender with sRGB color space for albedo/base color and Non-Color for normal, roughness, metallic, AO, height, and ORM maps. Connect normal maps through a Normal Map node, then adjust UV scale with a Mapping node so the material repeats naturally on your model.
For the full step-by-step setup, see How to Use Seamless Textures in Blender. Browse related material examples in wood, concrete, and metal.
Yes. This texture is designed as a seamless tileable PBR material, so it can repeat across large surfaces without visible borders.
You can download PNG/WEBP versions and use 1K, 2K, 4K and 8K download options when available on the page.
Yes. The download options and engine-mapped ZIP workflow are designed for Blender, Unreal Engine, Unity Standard, URP and HDRP material pipelines.
Yes. The texture is available under the AITextured free commercial license. Review the license page for redistribution and AI-training restrictions.


Build, preview, and export seamless PBR materials. Generate full map sets from a single image, inspect them in a real-time WebGL viewer, and re-package maps for Unreal, Unity, and Blender—directly in your browser.
AI text-to-texture: type a prompt and get a seamless, tileable base image ready for PBR workflows (great starting point for materials).
Create a full PBR set (Normal, Roughness, AO, Metallic, etc.) from a single image. Seamless and tiling-friendly.
Instant WebGL viewer: inspect materials on a sphere, plane, and cube. Check tiling and lighting in real time.
Re-packages maps per engine: Unreal (BaseColor + ORM), Unity (Mask/MetallicSmoothness), Blender (separate channels).
PNG ↔ JPG ↔ SVG: fast convert, SVG rasterize, embed/trace options, quality & background controls.