
Rust Spots And Rust Streaks With Surface Rust And Rust Flakes Detailing
Seamless texture (tileable) · PNG, WEBP, PBR ZIP. License: AITextured Free Commercial License (FCL) v1.1. Free personal and commercial use. Raw resale, standalone redistribution, mirroring/scraping, competing asset packs, and AI/ML training are not allowed without written permission. Attribution is not required, but appreciated..

| ID | seamless-3d-texture-pbr-8k-peeling-stickers-and-duct-tape-residue-with-torn-paper-and-sticker-tears-effects |
|---|---|
| Category | Decals |
| Formats | PNG, WEBP, PBR ZIP |
| Size | 1k (1024x1024px), 2k (2048x2048px), 4k (4096x4096px), 8k (8192x8192px) |
| Color | sRGB |
| Tileable | Yes |
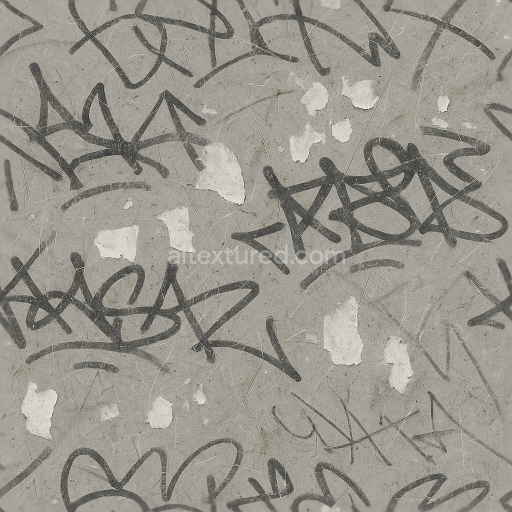
This seamless 3D PBR texture rendered in an ultra-high 8K resolution captures the complex and layered appearance of peeling stickers and duct tape residue over a worn industrial surface. The base material simulates a weathered substrate likely aged metal or painted wood characterized by slight porosity and surface irregularities from prolonged exposure and wear. Over this multiple layers of adhesive materials—old stickers duct tape strips and torn paper fragments—create a composite laminate effect. The peeling stickers and torn paper exhibit fibrous edges with visible grain patterns typical of paper and vinyl while the duct tape residue presents a semi-translucent fibrous mesh structure indicative of woven fabric embedded in a rubbery binder.
The composition showcases a realistic interplay of materials: the substrate base is coated with a dull chipped paint layer incorporating pigments that suggest faded warning labels and caution stripes in yellow black and red hues. These pigments are irregularly worn revealing the underlying metal or wood texture. The adhesive binders resembling aged acrylic or rubber compounds retain a tacky matte finish with subtle glossiness around edges where the tape and stickers curl. This tactile variation translates into the PBR maps as follows: the BaseColor (Albedo) channel reflects muted desaturated colors with localized high-contrast areas where tears and residue expose different layers. The Normal map captures the torn edges curled paper fibers and adhesive wrinkles providing pronounced microgeometry. Roughness varies across surfaces with adhesive residues showing moderate roughness and worn paint areas presenting higher roughness due to erosion. The Metallic channel remains minimal or near zero as most components are non-metallic except for slight specular highlights on exposed metal substrate. Ambient Occlusion emphasizes crevices beneath torn paper and tape edges enhancing depth perception while Height/Displacement maps provide subtle relief to simulate curled edges and surface decay.
The geometric form of this texture is inherently irregular and organic lacking repetitive patterns but designed to tile seamlessly for extended surfaces. The layered arrangement mimics real-world adhesive wear with tape strips partially overlapping warning labels and torn paper patches creating a visually rich and believable surface. This makes it ideal for urban environments industrial props or street signage within Blender Unreal Engine and Unity projects that demand photorealistic decal effects and surface detail at close camera distances.
For optimal usage it is recommended to carefully adjust the UV scale to maintain the natural size of the stickers and tape elements avoiding overly repetitive patterns. Additionally fine-tuning the roughness channel can enhance the tactile feel where increasing roughness around peeling edges simulates accumulated dirt and dust. Incorporating height or parallax mapping blended subtly with normal maps further accentuates the depth of torn paper and curling tape adding realism without excessive computational cost.
Import the texture maps into Blender with sRGB color space for albedo/base color and Non-Color for normal, roughness, metallic, AO, height, and ORM maps. Connect normal maps through a Normal Map node, then adjust UV scale with a Mapping node so the material repeats naturally on your model.
For the full step-by-step setup, see How to Use Seamless Textures in Blender. Browse related material examples in wood, concrete, and metal.
Yes. This texture is designed as a seamless tileable PBR material, so it can repeat across large surfaces without visible borders.
You can download PNG/WEBP versions and use 1K, 2K, 4K and 8K download options when available on the page.
Yes. The download options and engine-mapped ZIP workflow are designed for Blender, Unreal Engine, Unity Standard, URP and HDRP material pipelines.
Yes. The texture is available under the AITextured free commercial license. Review the license page for redistribution and AI-training restrictions.


Build, preview, and export seamless PBR materials. Generate full map sets from a single image, inspect them in a real-time WebGL viewer, and re-package maps for Unreal, Unity, and Blender—directly in your browser.
AI text-to-texture: type a prompt and get a seamless, tileable base image ready for PBR workflows (great starting point for materials).
Create a full PBR set (Normal, Roughness, AO, Metallic, etc.) from a single image. Seamless and tiling-friendly.
Instant WebGL viewer: inspect materials on a sphere, plane, and cube. Check tiling and lighting in real time.
Re-packages maps per engine: Unreal (BaseColor + ORM), Unity (Mask/MetallicSmoothness), Blender (separate channels).
PNG ↔ JPG ↔ SVG: fast convert, SVG rasterize, embed/trace options, quality & background controls.