
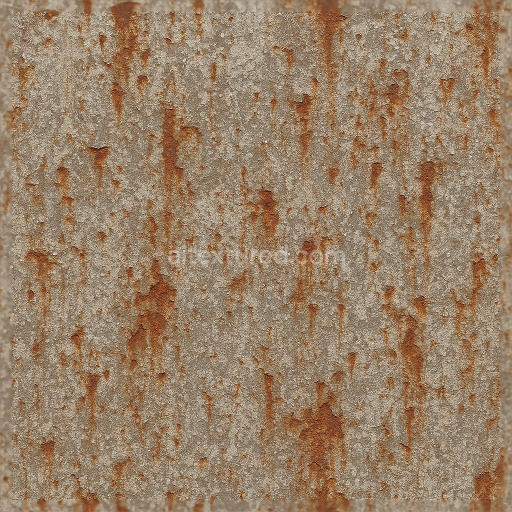
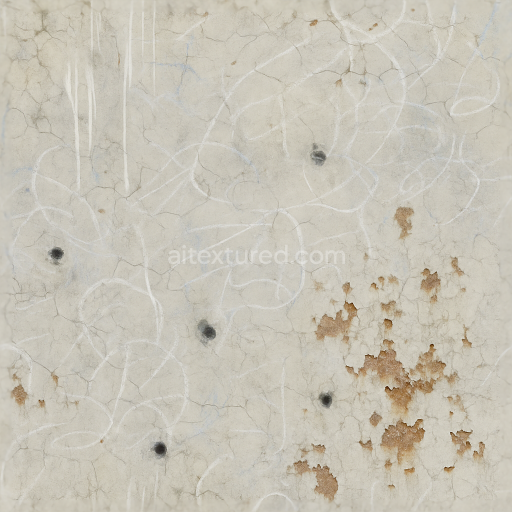
Bullet Holes And Rust Flakes With Scratched Metal And Surface Rust Effects
Seamless texture (tileable) · PNG, WEBP, PBR ZIP. License: AITextured Free Commercial License (FCL) v1.1. Free personal and commercial use. Raw resale, standalone redistribution, mirroring/scraping, competing asset packs, and AI/ML training are not allowed without written permission. Attribution is not required, but appreciated..

| ID | seamless-3d-texture-pbr-8k-scratched-metal-and-rusted-bolts-with-surface-corrosion-effects |
|---|---|
| Category | Decals |
| Formats | PNG, WEBP, PBR ZIP |
| Size | 1k (1024x1024px), 2k (2048x2048px), 4k (4096x4096px), 8k (8192x8192px) |
| Color | sRGB |
| Tileable | Yes |
This seamless 3D PBR texture in 8K resolution depicts a highly detailed scratched metal surface punctuated by rusted bolts and extensive surface corrosion. The base material is primarily a cold-rolled steel substrate characterized by its dense hard metallic structure. The metal exhibits a weathered finish with visible abrasions and scratches indicative of prolonged mechanical wear. Overlaying this are corroded iron oxide deposits forming irregular patches around the bolts and along crevices suggesting oxidation from environmental exposure. The surface retains a moderately rough texture with fine pitting and micro-abrasions lending authenticity to the metal’s aged state while the bolts themselves show granular rust buildup with flaking layers consistent with iron corrosion.*
The composition involves a complex interplay of materials: the steel core provides the metallic base while corrosion products act as natural binders with a porous flaky structure. Oil stains and smoke residues contribute organic film layers that subtly alter surface reflectivity and roughness. Ash residue and burnt edges introduce charred marks with a matte finish representing carbonized deposits from high-temperature exposure. This layering adds depth and visual complexity creating variation in porosity and surface reflectance. Coloration spans from cool silvery grays of the scratched metal to warm reddish-browns of rust muted black tones from soot and occasional dark iridescent patches from oil all captured with precise albedo detail.*
In terms of PBR channel mapping the BaseColor (Albedo) channel faithfully reproduces the nuanced color palette of oxidized metal rust and organic staining. The Normal map incorporates fine scratches dented bolt heads and detailed corrosion texture enhancing surface relief realism. Roughness maps vary across the texture with higher roughness values on corroded and burnt areas and lower values on exposed steel surfaces and oil-streaked zones accurately simulating light scattering. The Metallic channel remains high for the steel substrate but decreases in oxidized and burnt regions to reflect non-metallic corrosion layers. Ambient Occlusion emphasizes crevices and bolt recesses enhancing depth perception. Height/Displacement maps are finely tuned to replicate subtle surface undulations from rust buildup and scratched indentations.*
This texture is optimized for use in Blender Unreal Engine and Unity where its ultra-high 8K resolution ensures exceptional detail even at close-up camera views. For practical application it is advisable to adjust the UV scale to maintain the balance between visible rust detail and metal grain size preventing texture repetition artifacts. Additionally tuning the roughness channel allows control over the wetness effect from oil stains and blending the height map with normals can enhance perceived depth without excessive geometry displacement preserving performance in real-time environments.*
Import the texture maps into Blender with sRGB color space for albedo/base color and Non-Color for normal, roughness, metallic, AO, height, and ORM maps. Connect normal maps through a Normal Map node, then adjust UV scale with a Mapping node so the material repeats naturally on your model.
For the full step-by-step setup, see How to Use Seamless Textures in Blender. Browse related material examples in wood, concrete, and metal.
Yes. This texture is designed as a seamless tileable PBR material, so it can repeat across large surfaces without visible borders.
You can download PNG/WEBP versions and use 1K, 2K, 4K and 8K download options when available on the page.
Yes. The download options and engine-mapped ZIP workflow are designed for Blender, Unreal Engine, Unity Standard, URP and HDRP material pipelines.
Yes. The texture is available under the AITextured free commercial license. Review the license page for redistribution and AI-training restrictions.


Build, preview, and export seamless PBR materials. Generate full map sets from a single image, inspect them in a real-time WebGL viewer, and re-package maps for Unreal, Unity, and Blender—directly in your browser.
AI text-to-texture: type a prompt and get a seamless, tileable base image ready for PBR workflows (great starting point for materials).
Create a full PBR set (Normal, Roughness, AO, Metallic, etc.) from a single image. Seamless and tiling-friendly.
Instant WebGL viewer: inspect materials on a sphere, plane, and cube. Check tiling and lighting in real time.
Re-packages maps per engine: Unreal (BaseColor + ORM), Unity (Mask/MetallicSmoothness), Blender (separate channels).
PNG ↔ JPG ↔ SVG: fast convert, SVG rasterize, embed/trace options, quality & background controls.