
Lambswool Soft Wool Thick Wool Fibers Wool Fuzz
Seamless texture (tileable) · PNG, WEBP, PBR ZIP. License: AITextured Free Commercial License (FCL) v1.1. Free personal and commercial use. Raw resale, standalone redistribution, mirroring/scraping, competing asset packs, and AI/ML training are not allowed without written permission. Attribution is not required, but appreciated..

| ID | seamless-3d-texture-pbr-8k-soft-wool-fleece-natural-wool-fabric |
|---|---|
| Category | Wool |
| Formats | PNG, WEBP, PBR ZIP |
| Size | 1k (1024x1024px), 2k (2048x2048px), 4k (4096x4096px), 8k (8192x8192px) |
| Color | sRGB |
| Tileable | Yes |
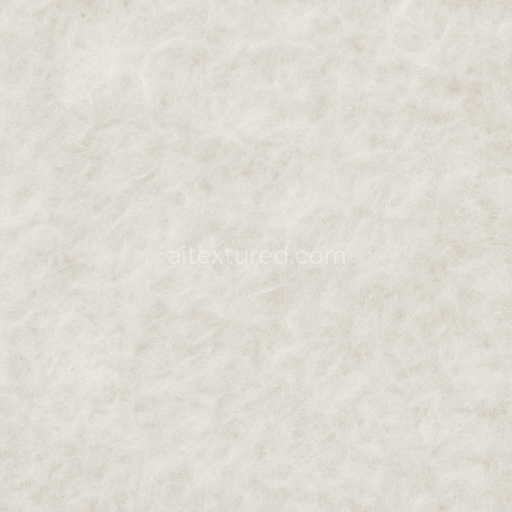
This seamless 8K PBR texture captures the intricate details of soft wool fleece in its natural wool fabric form showcasing a finely woven geometric pattern typical of tightly knit wool textiles. The base material consists of densely packed wool fibers—natural protein filaments derived from sheep—arranged in a short pile fleece structure that creates a soft tactile surface. The substrate is a flexible wool fabric base featuring a slight nap with delicate wool fluff and short pile fibers that give the material its characteristic warmth and insulation properties. The natural beige coloration arises from the raw wool’s inherent pigmentation with subtle tonal variations that enhance realism.
In terms of composition the texture simulates the interplay between the wool fibers themselves (acting as the primary aggregate) and the microscopic air pockets trapped within the fleece pile creating a porous breathable surface. There is no presence of binders or synthetic adhesives reflecting the authentic untreated wool fabric. The surface finish is matte and soft with no gloss or metallic reflection emphasizing the diffuse light-scattering quality of natural wool. Fine fiber detail is captured in the Normal and Height maps representing the uneven slightly raised pile while the Roughness map maintains a high roughness value to simulate the non-reflective wool surface. The Metallic channel is appropriately set to zero since wool is a non-metallic organic material. Ambient Occlusion enhances the depth perception in the fiber clusters and folds.
This 3D texture is optimized for use in Blender Unreal Engine and Unity ensuring compatibility with real-time rendering workflows and physically based shading models. The 8K resolution provides exceptional detail on closeups allowing artists to achieve photorealistic results when rendering wool garments upholstery or natural fabric surfaces. The seamless tile pattern enables repetitive application without visible seams making it ideal for large surfaces or 3D models requiring continuous fabric coverage.
For practical use it is recommended to carefully adjust the UV scale to balance between fiber detail visibility and overall fabric pattern repetition. Fine-tuning the Roughness map can help simulate different states of wool finish—from freshly sheared and soft to slightly worn or felted. Additionally blending the Normal and Height maps allows enhanced depth perception of the fleece pile improving realism especially when combined with parallax occlusion or displacement techniques. This ensures the soft wool fleece texture retains its tactile natural appearance under varied lighting and viewing angles.
Import the texture maps into Blender with sRGB color space for albedo/base color and Non-Color for normal, roughness, metallic, AO, height, and ORM maps. Connect normal maps through a Normal Map node, then adjust UV scale with a Mapping node so the material repeats naturally on your model.
For the full step-by-step setup, see How to Use Seamless Textures in Blender. Browse related material examples in wood, concrete, and metal.
Yes. This texture is designed as a seamless tileable PBR material, so it can repeat across large surfaces without visible borders.
You can download PNG/WEBP versions and use 1K, 2K, 4K and 8K download options when available on the page.
Yes. The download options and engine-mapped ZIP workflow are designed for Blender, Unreal Engine, Unity Standard, URP and HDRP material pipelines.
Yes. The texture is available under the AITextured free commercial license. Review the license page for redistribution and AI-training restrictions.


Build, preview, and export seamless PBR materials. Generate full map sets from a single image, inspect them in a real-time WebGL viewer, and re-package maps for Unreal, Unity, and Blender—directly in your browser.
AI text-to-texture: type a prompt and get a seamless, tileable base image ready for PBR workflows (great starting point for materials).
Create a full PBR set (Normal, Roughness, AO, Metallic, etc.) from a single image. Seamless and tiling-friendly.
Instant WebGL viewer: inspect materials on a sphere, plane, and cube. Check tiling and lighting in real time.
Re-packages maps per engine: Unreal (BaseColor + ORM), Unity (Mask/MetallicSmoothness), Blender (separate channels).
PNG ↔ JPG ↔ SVG: fast convert, SVG rasterize, embed/trace options, quality & background controls.