
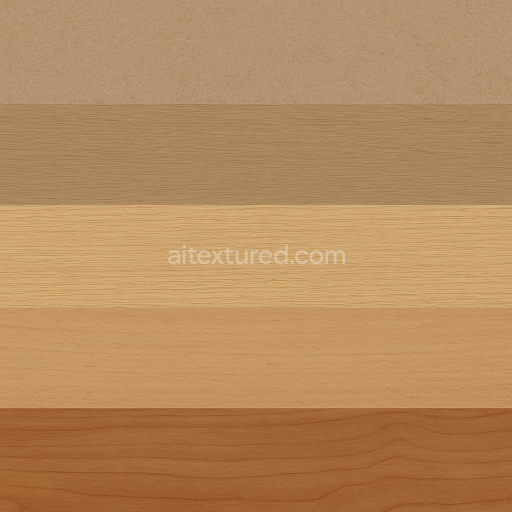
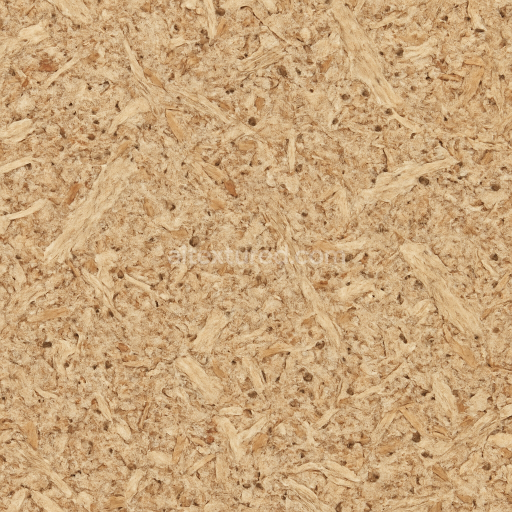
Fiberboard Laminated Matte Finish Surface
Seamless texture (tileable) · PNG, WEBP, PBR ZIP. License: AITextured Free Commercial License (FCL) v1.1. Free personal and commercial use. Raw resale, standalone redistribution, mirroring/scraping, competing asset packs, and AI/ML training are not allowed without written permission. Attribution is not required, but appreciated..

| ID | seamless-3d-texture-pbr-8k-mdf-edge-banded-smooth-surface-with-sanded-edges |
|---|---|
| Category | Furniture chipboard and MDF |
| Formats | PNG, WEBP, PBR ZIP |
| Size | 1k (1024x1024px), 2k (2048x2048px), 4k (4096x4096px), 8k (8192x8192px) |
| Color | sRGB |
| Tileable | Yes |
This seamless 3D texture in 8K resolution showcases a meticulously crafted MDF edge banded panel featuring a smooth sealed surface with finely sanded edges. Medium Density Fiberboard (MDF) serves as the core substrate composed primarily of wood fibers bonded together with synthetic resins and adhesives to create a dense uniform material. The edge banding incorporates materials such as veneer wood and plastic which are precisely applied to protect and enhance the panel edges. The surface finish is smooth and polished highlighting the subtle grain orientation and minimal porosity characteristic of high-quality MDF while the sanded edges provide a realistic tactile transition between the panel face and the banding. Pigments and dyes subtly influence the warm natural hues visible in the BaseColor channel contributing to the authentic wood-like appearance without overpowering the neutral tone typical of sealed MDF surfaces.
The PBR texture set includes detailed Normal and Height maps that realistically capture the slight surface variations of the smooth panel and the gentle bevel of the sanded edges. The Roughness channel balances a low-gloss finish on the smooth MDF surface with a slightly higher roughness around the edge banding accurately reflecting how light interacts with the sealed panel and the textured edges. The Metallic channel remains appropriately neutral as none of the materials exhibit metallic properties. Ambient Occlusion enhances the depth perception around the edges and junctions where banding meets the MDF core emphasizing the fine craftsmanship. This premium 8K resolution texture tiles flawlessly and is optimized for seamless application in 3D environments making it ideal for furniture and cabinetry models requiring precise and realistic material depiction.
Rendered under neutral flat lighting conditions this texture is fully compatible and Blender Unreal Engine and Unity ready facilitating immediate integration into various 3D visualization workflows. The high resolution ensures exceptional detail even in close-up shots supporting photorealistic renders and immersive real-time applications. For best results it is recommended to adjust the UV scale to maintain the natural grain size relative to the model and to fine-tune the roughness settings to match the desired level of surface glossiness especially when simulating finishes ranging from matte to semi-gloss. Additionally subtle use of the Height or Parallax maps can enhance edge definition adding realistic depth to cabinetry and furniture components.
Import the texture maps into Blender with sRGB color space for albedo/base color and Non-Color for normal, roughness, metallic, AO, height, and ORM maps. Connect normal maps through a Normal Map node, then adjust UV scale with a Mapping node so the material repeats naturally on your model.
For the full step-by-step setup, see How to Use Seamless Textures in Blender. Browse related material examples in wood, concrete, and metal.
Yes. This texture is designed as a seamless tileable PBR material, so it can repeat across large surfaces without visible borders.
You can download PNG/WEBP versions and use 1K, 2K, 4K and 8K download options when available on the page.
Yes. The download options and engine-mapped ZIP workflow are designed for Blender, Unreal Engine, Unity Standard, URP and HDRP material pipelines.
Yes. The texture is available under the AITextured free commercial license. Review the license page for redistribution and AI-training restrictions.


Build, preview, and export seamless PBR materials. Generate full map sets from a single image, inspect them in a real-time WebGL viewer, and re-package maps for Unreal, Unity, and Blender—directly in your browser.
AI text-to-texture: type a prompt and get a seamless, tileable base image ready for PBR workflows (great starting point for materials).
Create a full PBR set (Normal, Roughness, AO, Metallic, etc.) from a single image. Seamless and tiling-friendly.
Instant WebGL viewer: inspect materials on a sphere, plane, and cube. Check tiling and lighting in real time.
Re-packages maps per engine: Unreal (BaseColor + ORM), Unity (Mask/MetallicSmoothness), Blender (separate channels).
PNG ↔ JPG ↔ SVG: fast convert, SVG rasterize, embed/trace options, quality & background controls.