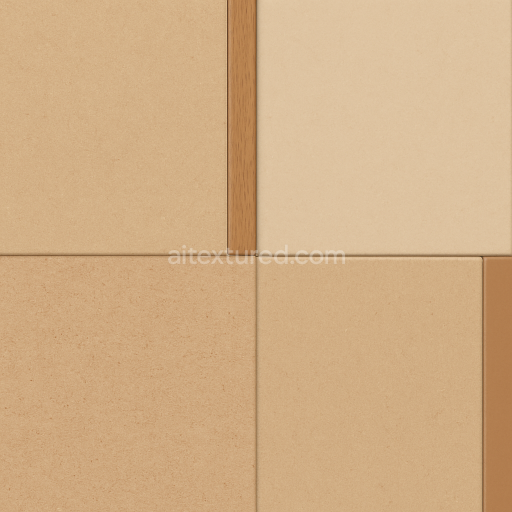
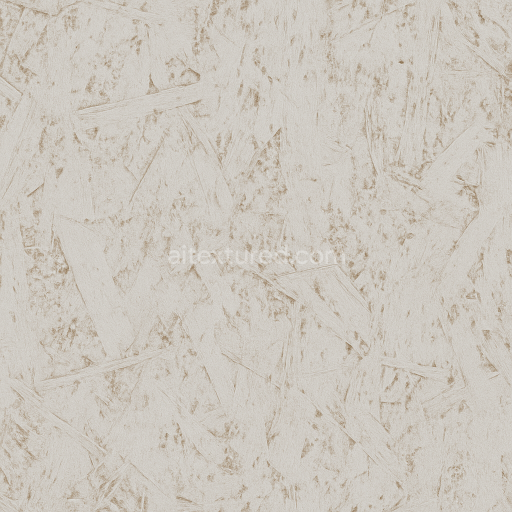
MDF Fire Retardant Smooth Surface with Uniform Texture
Seamless texture (tileable) · PNG, WEBP, PBR ZIP. License: AITextured Free Commercial License (FCL) v1.1. Free personal and commercial use. Raw resale, standalone redistribution, mirroring/scraping, competing asset packs, and AI/ML training are not allowed without written permission. Attribution is not required, but appreciated..

| ID | seamless-3d-texture-pbr-8k-mdf-primed-smooth-surface-with-sanded-edges |
|---|---|
| Category | Furniture chipboard and MDF |
| Formats | PNG, WEBP, PBR ZIP |
| Size | 1k (1024x1024px), 2k (2048x2048px), 4k (4096x4096px), 8k (8192x8192px) |
| Color | sRGB |
| Tileable | Yes |
This seamless 3D PBR texture showcases a high-resolution 8K representation of primed MDF a wood-based composite material renowned for its smooth surface and uniform structure. MDF or medium-density fiberboard is composed of finely ground wood fibers bonded with synthetic resins under heat and pressure resulting in a dense flat substrate ideal for painting and finishing. The primed coating applied to this MDF texture acts as a consistent base layer enhancing paint adhesion and providing a neutral light-toned finish that simulates the real-world preparation process of cabinetry or furniture panels. The expertly sanded edges reveal subtle fiber orientation and edge refinement contributing to the texture’s natural realism by mimicking the tactile smoothness and slight wear typically found on carefully processed MDF boards.
From a materials and composition standpoint this texture captures the intricate interplay between the MDF’s fine cellulose fibers and the synthetic binders that hold them together reflected in the PBR channels for a physically accurate rendering. The BaseColor/Albedo channel displays a soft uniform off-white tone indicative of a primed MDF surface while the Normal map emphasizes the subtle grain and surface imperfections that give depth without overwhelming detail. The Roughness channel balances a smooth finish with just enough micro-variation to avoid a flat appearance simulating the finely sanded coating. Metallic is set to zero consistent with the non-metallic nature of MDF and the Ambient Occlusion channel enhances the perception of depth around the edges and slight surface indentations. Height or Displacement maps capture the delicate edge bevels and surface undulations supporting advanced shading techniques in Blender Unreal Engine and Unity for photorealistic results.
Rendered under neutral flat lighting conditions this seamless texture avoids harsh shadows allowing 3D artists to focus on the material’s surface details and subtle nuances. Its 8K resolution ensures exceptional clarity making it ideal for close-up visualizations of furniture cabinetry or architectural elements where surface fidelity is critical. The seamless nature facilitates effortless tiling without visible borders perfect for large-scale projects or modular assets. For optimal results adjusting the UV scale to maintain the natural grain size and tuning the roughness parameter slightly can help integrate this texture seamlessly into different lighting environments enhancing realism across various rendering engines.
The MDF primed surface features a detailed 3D texture that is fully unreal blender ready ensuring accurate PBR appearance for realistic material rendering.
Import the texture maps into Blender with sRGB color space for albedo/base color and Non-Color for normal, roughness, metallic, AO, height, and ORM maps. Connect normal maps through a Normal Map node, then adjust UV scale with a Mapping node so the material repeats naturally on your model.
For the full step-by-step setup, see How to Use Seamless Textures in Blender. Browse related material examples in wood, concrete, and metal.
Yes. This texture is designed as a seamless tileable PBR material, so it can repeat across large surfaces without visible borders.
You can download PNG/WEBP versions and use 1K, 2K, 4K and 8K download options when available on the page.
Yes. The download options and engine-mapped ZIP workflow are designed for Blender, Unreal Engine, Unity Standard, URP and HDRP material pipelines.
Yes. The texture is available under the AITextured free commercial license. Review the license page for redistribution and AI-training restrictions.


Build, preview, and export seamless PBR materials. Generate full map sets from a single image, inspect them in a real-time WebGL viewer, and re-package maps for Unreal, Unity, and Blender—directly in your browser.
AI text-to-texture: type a prompt and get a seamless, tileable base image ready for PBR workflows (great starting point for materials).
Create a full PBR set (Normal, Roughness, AO, Metallic, etc.) from a single image. Seamless and tiling-friendly.
Instant WebGL viewer: inspect materials on a sphere, plane, and cube. Check tiling and lighting in real time.
Re-packages maps per engine: Unreal (BaseColor + ORM), Unity (Mask/MetallicSmoothness), Blender (separate channels).
PNG ↔ JPG ↔ SVG: fast convert, SVG rasterize, embed/trace options, quality & background controls.