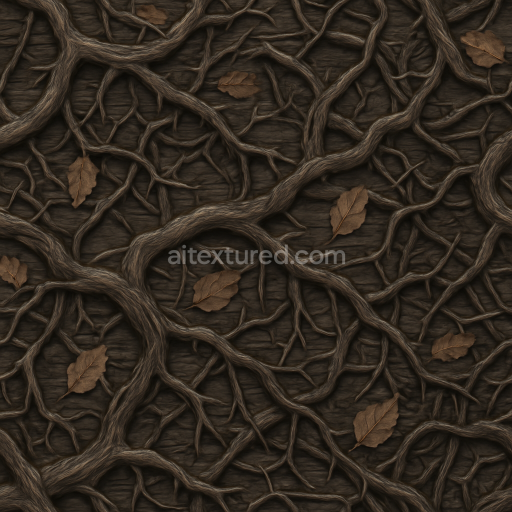
Spooky Vines With Thorny Branches And Twisted Branches Detail
Seamless texture (tileable) · PNG, WEBP, PBR ZIP. License: AITextured Free Commercial License (FCL) v1.1. Free personal and commercial use. Raw resale, standalone redistribution, mirroring/scraping, competing asset packs, and AI/ML training are not allowed without written permission. Attribution is not required, but appreciated..

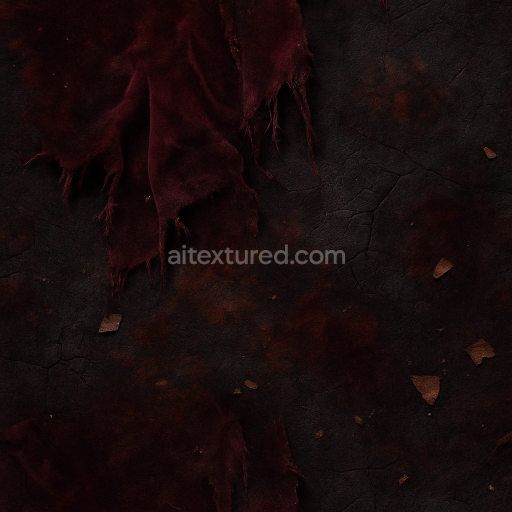
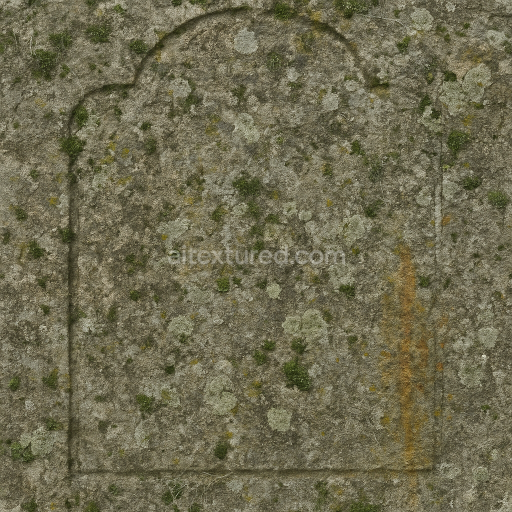
| ID | seamless-3d-texture-pbr-8k-cracked-earth-with-dark-stone-and-mold-spores-overlay |
|---|---|
| Category | Halloween |
| Formats | PNG, WEBP, PBR ZIP |
| Size | 1k (1024x1024px), 2k (2048x2048px), 4k (4096x4096px), 8k (8192x8192px) |
| Color | sRGB |
| Tileable | Yes |
This seamless 3D PBR texture in stunning 8K resolution captures the intricate details of cracked earth combined with dark stone fragments and scattered mold spores overlaying the surface. The base substrate resembles a weathered mineral-rich soil interspersed with rough uneven dark stone pieces that add natural hardness and variation. Organic elements such as patches of mold and fungus growth introduce a subtle fibrous texture and biological decay reflecting long-term exposure to damp conditions. The surface finish conveys a naturally rough and porous terrain with visible erosion and micro-cracks that enhance realism. Earthy pigments blend muted browns and deep grays while the mold spores contribute desaturated greenish tones collectively forming a complex photorealistic ground material ideal for haunted or abandoned outdoor environments.
In PBR channels the BaseColor (Albedo) clearly differentiates the cracked earth’s warmer brown hues from the cooler darker stone fragments and pale mold overlays. The Normal map emphasizes the intricate cracks jagged stone edges and delicate fungal textures adding convincing depth and relief. Roughness maps show varied surface friction with smoother dark stones contrasting the coarse porous soil and soft mold patches. The Metallic channel remains near zero reflecting the organic non-metallic nature of the materials. Ambient Occlusion enhances the crevices and overlaps between earth stone and mold while the Height/Displacement map accurately portrays surface irregularities and layered decay enhancing parallax effects in real-time engines.
Designed for seamless tiling without visible borders this texture integrates effortlessly into Blender Unreal Engine and Unity projects supporting highly detailed large-scale terrain creation. Its neutral flat lighting setup—with no embedded shadows—ensures maximum flexibility for dynamic scene illumination and customization. For optimal results it is recommended to adjust UV scale to moderate levels to maintain fine crack detail without repetition artifacts and to fine-tune roughness values to balance wet and dry appearances depending on the environment’s mood or weather conditions. This versatile texture is particularly ideal for Halloween-themed grounds haunted outdoor scenes or any project requiring authentic cracked earth with natural stone and organic decay overlays.
Import the texture maps into Blender with sRGB color space for albedo/base color and Non-Color for normal, roughness, metallic, AO, height, and ORM maps. Connect normal maps through a Normal Map node, then adjust UV scale with a Mapping node so the material repeats naturally on your model.
For the full step-by-step setup, see How to Use Seamless Textures in Blender. Browse related material examples in wood, concrete, and metal.
Yes. This texture is designed as a seamless tileable PBR material, so it can repeat across large surfaces without visible borders.
You can download PNG/WEBP versions and use 1K, 2K, 4K and 8K download options when available on the page.
Yes. The download options and engine-mapped ZIP workflow are designed for Blender, Unreal Engine, Unity Standard, URP and HDRP material pipelines.
Yes. The texture is available under the AITextured free commercial license. Review the license page for redistribution and AI-training restrictions.
Build, preview, and export seamless PBR materials. Generate full map sets from a single image, inspect them in a real-time WebGL viewer, and re-package maps for Unreal, Unity, and Blender—directly in your browser.
AI text-to-texture: type a prompt and get a seamless, tileable base image ready for PBR workflows (great starting point for materials).
Create a full PBR set (Normal, Roughness, AO, Metallic, etc.) from a single image. Seamless and tiling-friendly.
Instant WebGL viewer: inspect materials on a sphere, plane, and cube. Check tiling and lighting in real time.
Re-packages maps per engine: Unreal (BaseColor + ORM), Unity (Mask/MetallicSmoothness), Blender (separate channels).
PNG ↔ JPG ↔ SVG: fast convert, SVG rasterize, embed/trace options, quality & background controls.