Torn Edges Peeling Layers Paper Fibers Wood Grain Abstract Stone Veins
Seamless texture (tileable) · PNG, WEBP, PBR ZIP. License: AITextured Free Commercial License (FCL) v1.1. Free personal and commercial use. Raw resale, standalone redistribution, mirroring/scraping, competing asset packs, and AI/ML training are not allowed without written permission. Attribution is not required, but appreciated..

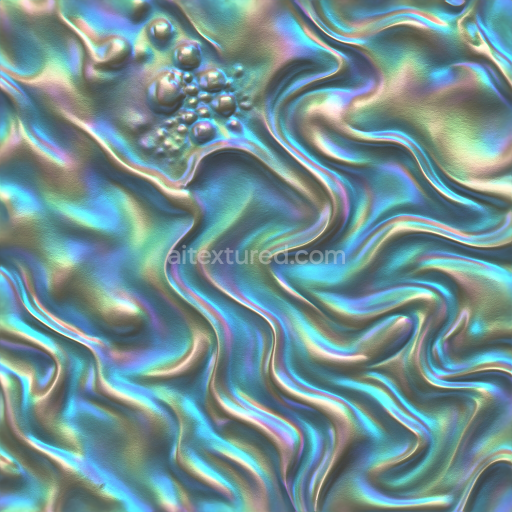
| ID | seamless-3d-texture-pbr-8k-topographic-lines-contour-lines-noise-grain-static-interference-digital-glitch |
|---|---|
| Category | Abstract |
| Formats | PNG, WEBP, PBR ZIP |
| Size | 1k (1024x1024px), 2k (2048x2048px), 4k (4096x4096px), 8k (8192x8192px) |
| Color | sRGB |
| Tileable | Yes |
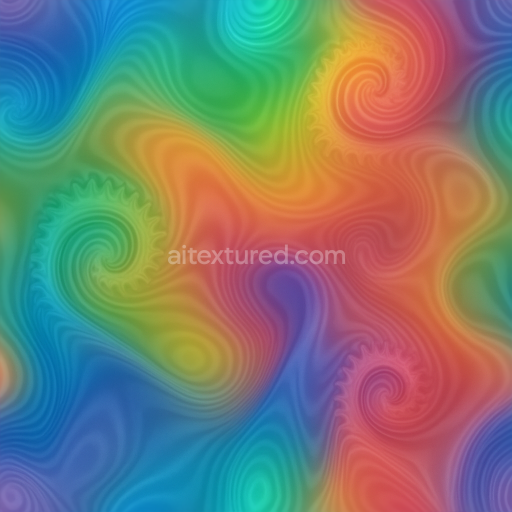
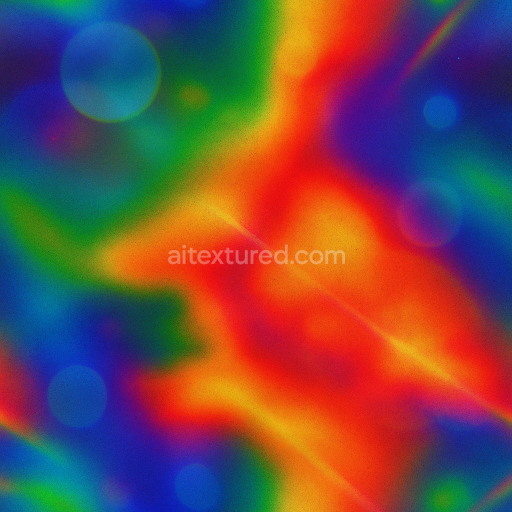
This seamless 3D PBR texture presents a highly detailed topographic surface defined by finely etched contour lines and layered elevation patterns, reminiscent of geological maps or digital terrain models. The base material suggests a composite substrate akin to a matte polymer or coated resin panel, providing a smooth yet subtly textured foundation. Embedded within this substrate are micro-scale aggregates and fine grain particles that introduce natural noise and static interference effects, simulating the tactile variation of weathered and digitized surfaces. The color palette is primarily monochromatic with nuanced grayscale tones, enhanced by pixel noise and digital glitch artifacts that contribute to an abstract, data-driven aesthetic.
The texture’s form is characterized by continuous, flowing topographic ridges and valleys outlined by crisp contour lines that generate perceptible depth and structure. These geometric patterns are accentuated through multiple PBR channels: the BaseColor (Albedo) maps the grayscale gradients and glitch details, while the Normal map encodes the subtle elevations and depressions of the contour lines, enhancing surface relief. The Roughness map balances matte and semi-gloss areas, reflecting the interplay between smooth polymer surfaces and rough, grainy interference zones. A low metallic value ensures a non-metallic finish, consistent with natural or synthetic polymer materials, while Ambient Occlusion adds localized shadowing to reinforce depth perception. Height and Displacement maps provide accurate parallax effects, allowing for realistic renderings of the layered topography.
Rendered at 8K resolution, this texture delivers exceptional fidelity suitable for high-end applications across Blender, Unreal Engine, and Unity. Its seamless tiling ensures uninterrupted continuity across large surfaces, making it ideal for environments requiring expansive, detailed abstract landscapes or sci-fi user interfaces. The digital glitch and pixel noise elements introduce a dynamic complexity, useful for projects aiming to merge organic forms with technological motifs.
For optimal results, it is advisable to adjust the UV scale carefully to maintain the clarity of fine contour details without losing the overall topographic impression. Additionally, fine-tuning the roughness map can help control the balance between glossiness and matte finish, enhancing the material’s realistic interaction with light. When working with height and normal maps, blending them appropriately allows for enhanced depth and surface complexity, particularly in close-up views or interactive scenes.
Import the texture maps into Blender with sRGB color space for albedo/base color and Non-Color for normal, roughness, metallic, AO, height, and ORM maps. Connect normal maps through a Normal Map node, then adjust UV scale with a Mapping node so the material repeats naturally on your model.
For the full step-by-step setup, see How to Use Seamless Textures in Blender. Browse related material examples in wood, concrete, and metal.
Yes. This texture is designed as a seamless tileable PBR material, so it can repeat across large surfaces without visible borders.
You can download PNG/WEBP versions and use 1K, 2K, 4K and 8K download options when available on the page.
Yes. The download options and engine-mapped ZIP workflow are designed for Blender, Unreal Engine, Unity Standard, URP and HDRP material pipelines.
Yes. The texture is available under the AITextured free commercial license. Review the license page for redistribution and AI-training restrictions.


Generate, preview, and export seamless PBR materials for Blender, Unity, and Unreal Engine—directly in your browser.
AI text-to-texture: type a prompt and get a seamless, tileable base image ready for PBR workflows (great starting point for materials).
Create a full PBR set (Normal, Roughness, AO, Metallic, etc.) from a single image. Seamless and tiling-friendly.
Instant WebGL viewer: inspect materials on a sphere, plane, and cube. Check tiling and lighting in real time.
Re-packages maps per engine: Unreal (BaseColor + ORM), Unity (Mask/MetallicSmoothness), Blender (separate channels).
PNG ↔ JPG ↔ SVG: fast convert, SVG rasterize, embed/trace options, quality & background controls.