
Scratched Plastic And Paint Chips With Dust Particles And Grime Buildup Effects
Seamless texture (tileable) · PNG, WEBP, PBR ZIP. License: AITextured Free Commercial License (FCL) v1.1. Free personal and commercial use. Raw resale, standalone redistribution, mirroring/scraping, competing asset packs, and AI/ML training are not allowed without written permission. Attribution is not required, but appreciated..

| ID | seamless-3d-texture-pbr-8k-mud-splatter-and-dust-particles-for-natural-ground-surface-effects |
|---|---|
| Category | Decals |
| Formats | PNG, WEBP, PBR ZIP |
| Size | 1k (1024x1024px), 2k (2048x2048px), 4k (4096x4096px), 8k (8192x8192px) |
| Color | sRGB |
| Tileable | Yes |
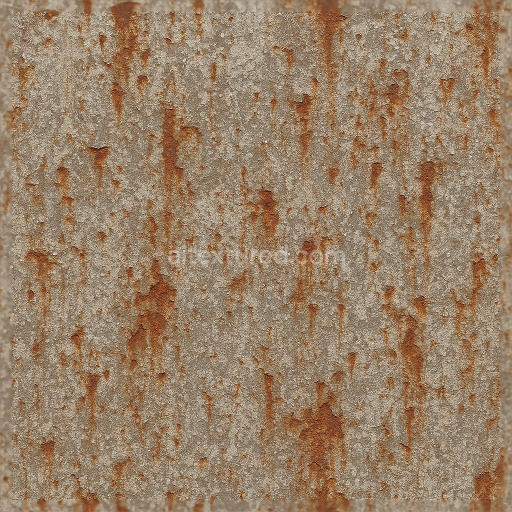
This seamless 3D texture features an 8K resolution PBR material meticulously crafted to replicate natural ground surfaces characterized by mud splatter and fine dust particles. The base material simulates compacted soil with a slightly rough granular substrate composed of clay silt and organic matter. Embedded within this matrix are irregular aggregates of mud clumps and fine dirt grains which contribute to the texture’s uneven porous appearance. The surface exhibits subtle weathering effects such as dried mud cracks and erosion patterns reflecting natural environmental wear. The overall form is an organic irregular pattern with random mud splatter shapes layered over a dusty ground plane creating a convincing dirt-covered terrain with depth and complexity.
Additional layered details include realistic fingerprints wear marks and scuff marks applied as thin translucent overlays that simulate surface oils and abrasion on wet or recently disturbed soil. Burn marks introduce darkened charred areas with softened edges that blend naturally into the substrate while peeling stickers and worn warning labels introduce an industrial element. These decals appear as partially detached adhesive films with curled edges incorporating subtle translucency and surface scratches to emphasize aging and weathering. The geometric form of these decals contrasts with the organic ground adding visual interest through their rectangular shapes and layered placement.
The PBR channels are carefully mapped to represent these materials and forms accurately. The BaseColor (Albedo) channel captures the earthy browns and muted yellows of soil rich black and gray tones for burn marks and faded reds and whites for warning labels and peeling stickers. The Normal map encodes fine surface details such as mud clumps dust particle granularity finger ridges and sticker creases enhancing the tactile impression. Roughness values vary across the texture to reflect differences in moisture and wear: smoother shinier patches correspond to moist mud and fingerprints while dusty areas exhibit higher roughness. The Metallic channel remains near zero throughout consistent with non-metallic soil and organic material. Ambient Occlusion enhances depth perception around mud edges decal creases and scuffed areas. The Height/Displacement map provides subtle relief for mud accumulation and decal peeling supporting effective parallax and displacement effects in real-time engines.
Designed for compatibility with Blender Unreal Engine and Unity this texture’s 8K resolution ensures exceptional clarity and detail even in close-up views making it suitable for high-fidelity outdoor scenes and weathered object surfaces. For practical use it’s recommended to carefully adjust the UV scale to avoid repetitive patterns in large terrain applications. Additionally tuning the roughness channel can help blend the wet and dry areas more naturally and blending the height map with normal details enhances the perceived depth of mud splatters and decal edges without excessive geometry. This texture provides a versatile foundation for creating gritty realistic environmental effects with layered complexity and material authenticity.
Import the texture maps into Blender with sRGB color space for albedo/base color and Non-Color for normal, roughness, metallic, AO, height, and ORM maps. Connect normal maps through a Normal Map node, then adjust UV scale with a Mapping node so the material repeats naturally on your model.
For the full step-by-step setup, see How to Use Seamless Textures in Blender. Browse related material examples in wood, concrete, and metal.
Yes. This texture is designed as a seamless tileable PBR material, so it can repeat across large surfaces without visible borders.
You can download PNG/WEBP versions and use 1K, 2K, 4K and 8K download options when available on the page.
Yes. The download options and engine-mapped ZIP workflow are designed for Blender, Unreal Engine, Unity Standard, URP and HDRP material pipelines.
Yes. The texture is available under the AITextured free commercial license. Review the license page for redistribution and AI-training restrictions.


Build, preview, and export seamless PBR materials. Generate full map sets from a single image, inspect them in a real-time WebGL viewer, and re-package maps for Unreal, Unity, and Blender—directly in your browser.
AI text-to-texture: type a prompt and get a seamless, tileable base image ready for PBR workflows (great starting point for materials).
Create a full PBR set (Normal, Roughness, AO, Metallic, etc.) from a single image. Seamless and tiling-friendly.
Instant WebGL viewer: inspect materials on a sphere, plane, and cube. Check tiling and lighting in real time.
Re-packages maps per engine: Unreal (BaseColor + ORM), Unity (Mask/MetallicSmoothness), Blender (separate channels).
PNG ↔ JPG ↔ SVG: fast convert, SVG rasterize, embed/trace options, quality & background controls.