The polished granite texture seamless high resolution up to 8k presents an exquisitely detailed stone surface that replicates the natural composition and finish of real granite. Granite, a coarse-grained igneous rock primarily composed of quartz, feldspar, and mica, forms the base substrate, offering a durable and visually striking foundation. The texture reflects a finely polished surface, characterized by a smooth, reflective finish achieved through mechanical abrasion and polishing techniques. This process reduces porosity and enhances the stone’s inherent color variations, ranging from subtle grays and pinks to deep blacks and whites, brought out by mineral inclusions and natural oxide layers. The interplay of these mineral grains and their orientation creates a unique, natural pattern that is both elegant and timeless, perfectly suited for architectural visualization, game environments, and interior staging projects.
In terms of PBR workflow, this tileable polished granite texture seamless high resolution up to 8k excels by delivering comprehensive material data across multiple channels. The BaseColor (Albedo) channel captures the rich, varied hues and subtle veining of granite, while the Normal map conveys the intricate grain orientation and surface micro-roughness, enhancing depth and realism without compromising the polished smoothness. The Roughness channel is finely tuned to reflect the low surface roughness typical of polished stone, producing crisp specular highlights and realistic reflections. The Metallic channel remains minimal, consistent with the non-metallic nature of granite. Ambient Occlusion adds natural shadowing in crevices and between mineral grains, increasing visual depth, while the Height/Displacement map offers subtle surface variations to simulate the tactile irregularities and slight undulations found on real granite slabs.
This seamless polished granite texture high resolution up to 8k is meticulously crafted and curated within the stone textures category to ensure clean, repeatable patterns that scale elegantly across large surfaces without visible seams. Designed for seamless integration, the texture is compatible with Blender, Unity, and Unreal Engine, requiring minimal setup for immediate use. When applying this texture in 3D scenes, it is advisable to maintain consistent texel density and uniform UV mapping to avoid pattern stretching and preserve the material’s natural look. Additionally, tuning the roughness slightly can help adapt the polished finish to different lighting conditions or desired levels of gloss, enhancing realism in both product mockups and large architectural surfaces.
Overall, this AI-generated polished granite texture seamless high resolution up to 8k balances crisp detail with controlled visual noise, resulting in a natural, believable stone surface ideal for a wide range of digital projects. Its high resolution ensures exceptional clarity and realism, making it a valuable addition to any material library focused on stone textures and realistic 3D previews. Whether used in archviz, game environments, or interior staging, this texture provides both aesthetic appeal and technical flexibility to meet professional standards.
The ai texture polished granite texture seamless high resolution up to 8k offers a highly detailed and realistic PBR appearance, showcasing the polished granite texture seamless high resolution up to 8ktexture with flawless continuity and clarity.
How to Use These Seamless PBR Textures in Blender
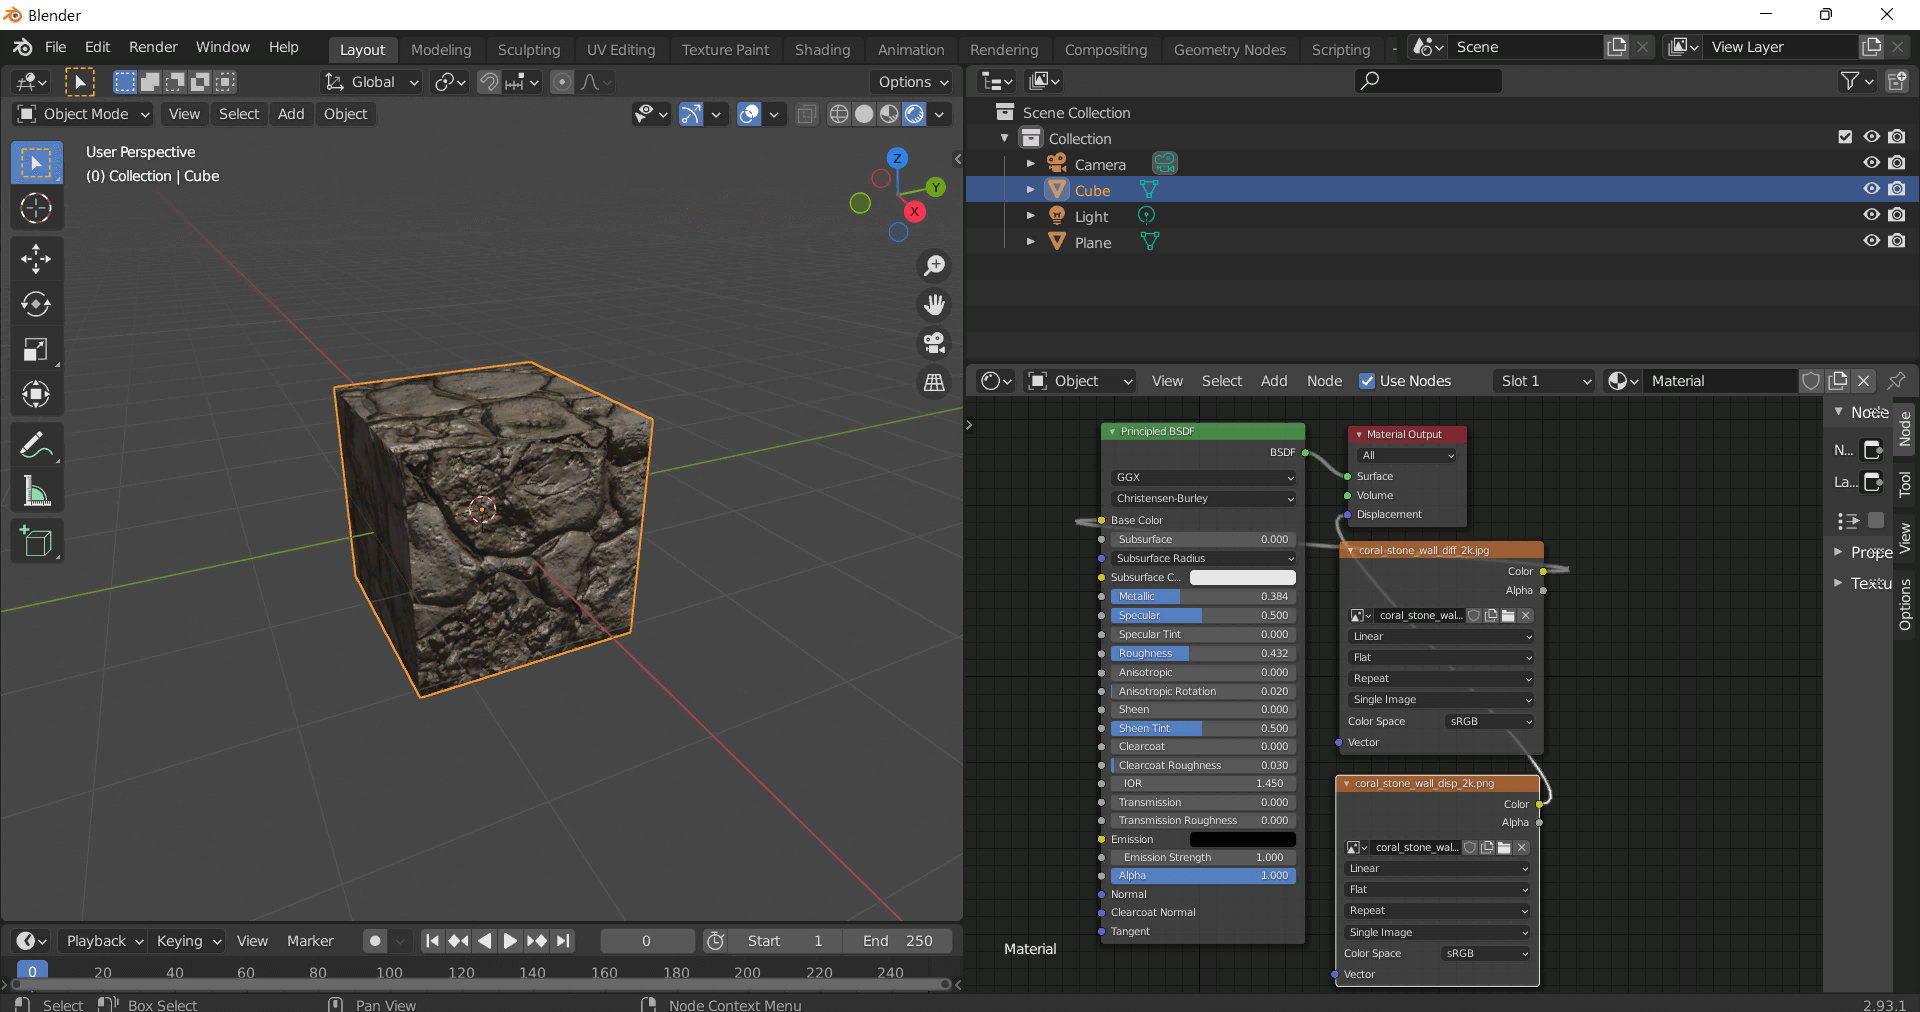
This guide shows how to connect a full PBR texture set to Principled BSDF in Blender (Cycles or Eevee). Works with any of our seamless textures free download, including PBR PNG materials for Blender / Unreal / Unity.
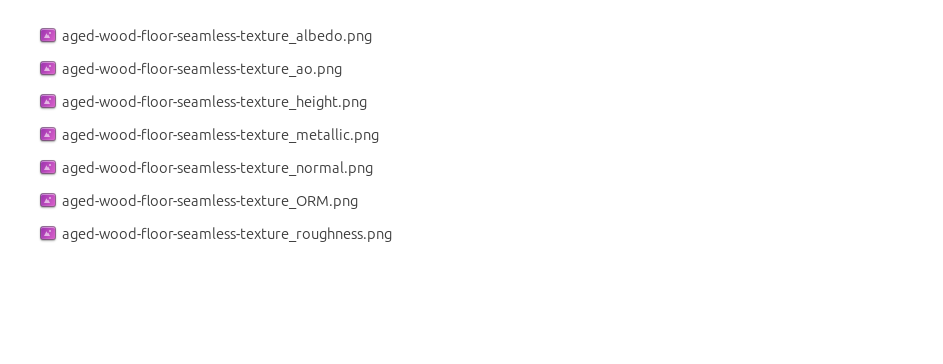
What’s inside the download
*_albedo.png — Base Color (sRGB)*_normal.png — Normal map (Non-Color)*_roughness.png — Roughness (Non-Color)*_metallic.png — Metallic (Non-Color)*_ao.png — Ambient Occlusion (Non-Color)*_height.png — Height / Displacement (Non-Color)*_ORM.png — Packed map (R=AO, G=Roughness, B=Metallic, Non-Color)
Quick start (Node Wrangler, 30 seconds)
- Enable the addon: Edit → Preferences → Add-ons → Node Wrangler.
- Create a material and select the Principled BSDF node.
- Press Ctrl + Shift + T and select the maps
albedo, normal, roughness, metallic (skip height and ORM for now) → Open.
The addon wires Base Color, Normal (with a Normal Map node), Roughness, and Metallic automatically.
- Add AO and Height using the “Manual wiring” steps below (5 and 6).
Manual wiring (full control)
- Create a material (Material Properties → New) and open the Shader Editor.
- Add an Image Texture node for each map. Set Color Space:
- Albedo → sRGB
- AO, Roughness, Metallic, Normal, Height, ORM → Non-Color
- Connect to Principled BSDF:
albedo → Base Colorroughness → Roughnessmetallic → Metallic (for wood this often stays near 0)normal → Normal Map node (Type: Tangent Space) → Normal of Principled.
If details look “inverted”, enable Invert Y on the Normal Map node.
- Ambient Occlusion (AO):
- Add a MixRGB (or Mix Color) node in mode Multiply.
- Input A =
albedo, Input B = ao, Factor = 1.0.
- Output of Mix → Base Color of Principled (replaces the direct albedo connection).
- Height / Displacement:
Cycles — true displacement
- Material Properties → Settings → Displacement: Displacement and Bump.
- Add a Displacement node: connect
height → Height, set Midlevel = 0.5, Scale = 0.02–0.08 (tune to taste).
- Output of Displacement → Material Output → Displacement.
- Add geometry density (e.g., Subdivision Surface) so displacement has polygons to work with.
Eevee (or lightweight Cycles) — bump only
- Add a Bump node:
height → Height.
- Set Strength = 0.2–0.5, Distance = 0.05–0.1, and connect Normal output to Principled’s Normal.
Using the packed ORM texture (optional)
Instead of separate AO/Roughness/Metallic maps you can use the single *_ORM.png:
- Add one Image Texture (Non-Color) → Separate RGB (or Separate Color).
- R (red) → AO (use it in the Multiply node with albedo as above).
- G (green) → Roughness of Principled.
- B (blue) → Metallic of Principled.
UVs & seamless tiling
- These textures are seamless. If your mesh has no UVs, go to UV Editing → Smart UV Project.
- For scale/repeat, add Texture Coordinate (UV) → Mapping and plug it into all texture nodes.
Increase Mapping → Scale (e.g., 2/2/2) to tile more densely.
Recommended starter values
- Normal Map Strength: 0.5–1.0
- Bump Strength: ~0.3
- Displacement Scale (Cycles): ~0.03
Common pitfalls
- Wrong Color Space (normals/roughness/etc. must be Non-Color).
- “Inverted” details → enable Invert Y on the Normal Map node.
- Over-strong relief → lower Displacement Scale or Bump Strength.
Example: Download Wood Textures and instantly apply parquet or rustic planks inside Blender for architectural visualization.
To add the downloaded texture, go to Add — Texture — Image Texture.
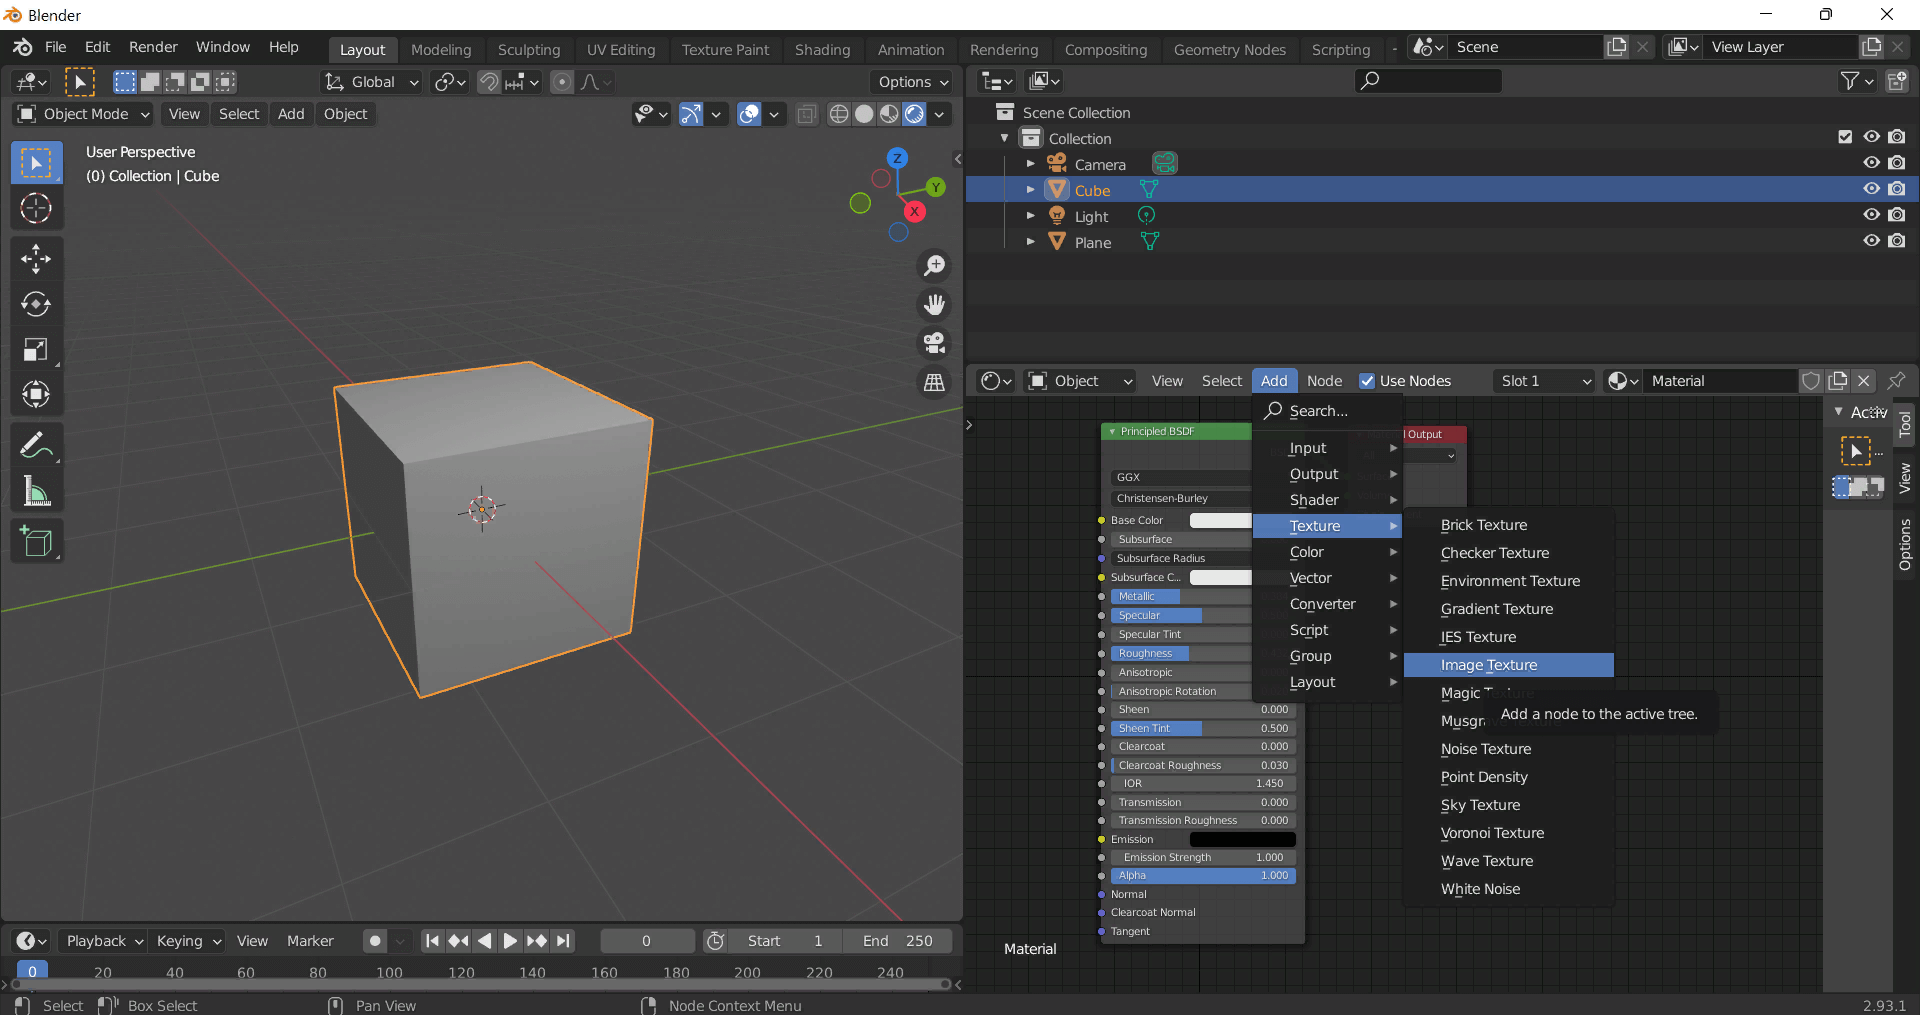
Add a node and click the Open button.
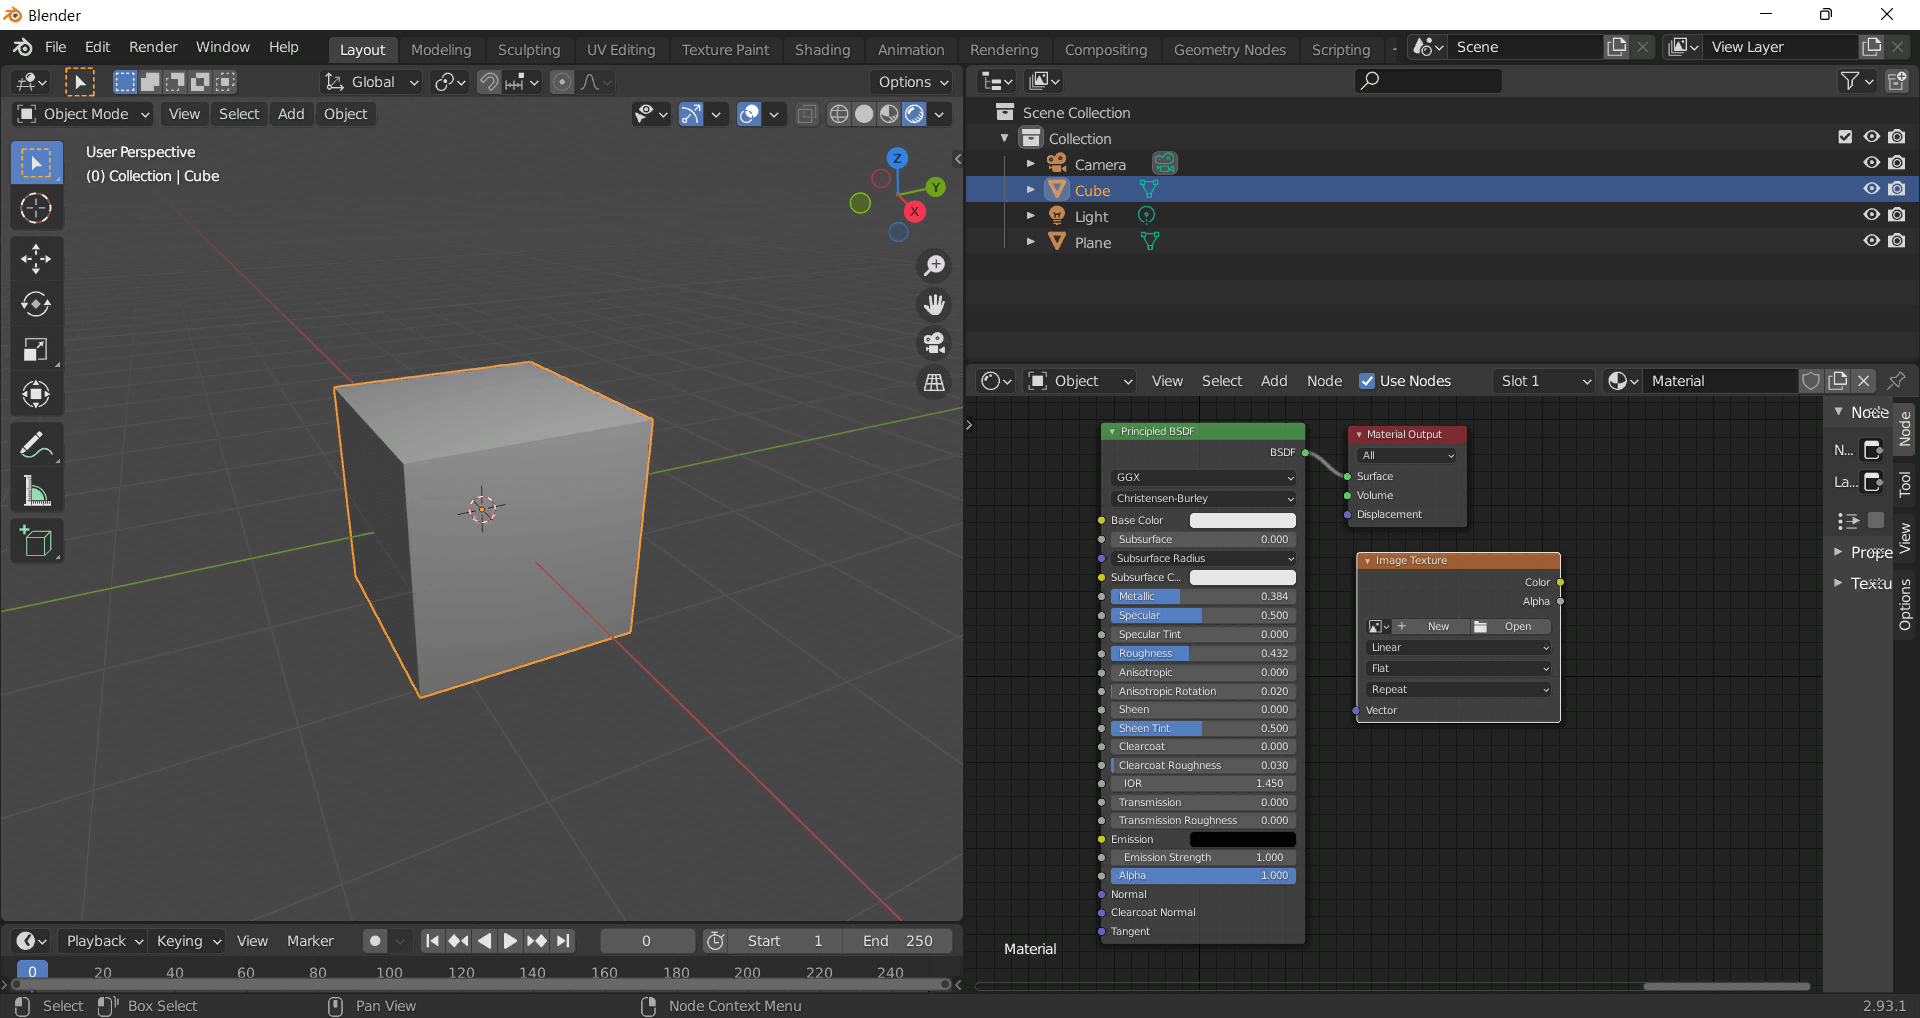
Select the required texture on your hard drive and connect Color to Base Color.