
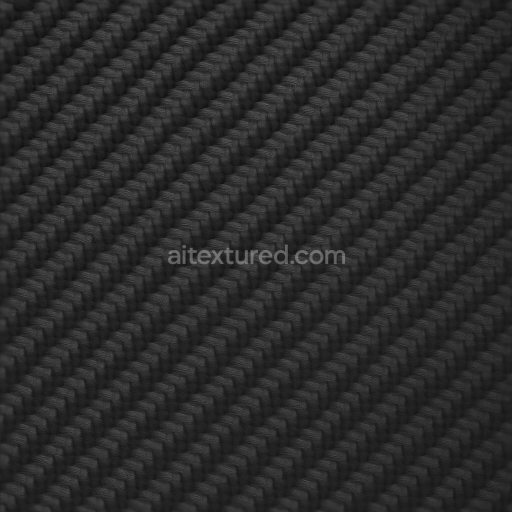
PBR Seamless 3D Texture Of Carbon Twill Weave In 8K For Realistic Material Rendering
Seamless texture (tileable) · PNG, WEBP, PBR ZIP. License: AITextured Free Commercial License (FCL) v1.1. Free personal and commercial use. Raw resale, standalone redistribution, mirroring/scraping, competing asset packs, and AI/ML training are not allowed without written permission. Attribution is not required, but appreciated..

| ID | seamless-3d-pbr-texture-of-carbon-twisted-strands-with-carbon-glossy-finish-for-8k-realistic-surfaces |
|---|---|
| Category | Carbon |
| Formats | PNG, WEBP, PBR ZIP |
| Size | 1k (1024x1024px), 2k (2048x2048px), 4k (4096x4096px), 8k (8192x8192px) |
| Color | sRGB |
| Tileable | Yes |
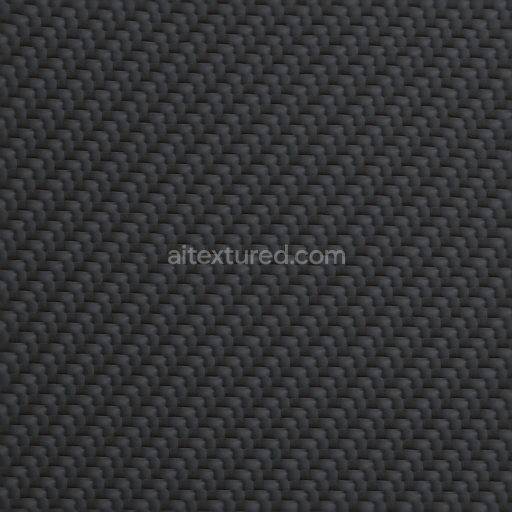
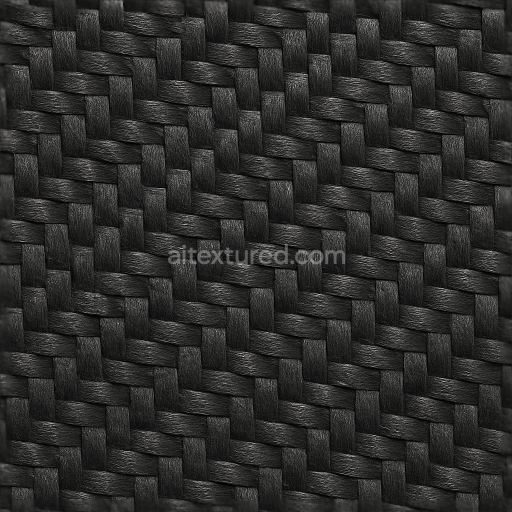
This seamless 3D PBR texture features a meticulously crafted pattern of twisted carbon strands, forming a dense, interlaced composite surface characteristic of high-performance carbon fiber materials. The base substrate consists of tightly woven carbon filaments, each exhibiting a subtle helical twist that enhances mechanical strength and visual complexity. These fibers are bound by a durable polymer resin matrix, simulating the epoxy binders commonly used in automotive-grade carbon composites. The overall form presents a layered weave with overlapping strands, creating a slightly raised, tactile geometry that captures the anisotropic nature of carbon fiber fabrics.
The texture’s surface finish is a glossy carbon black, replicating the polished resin coat applied to finished carbon fiber panels. This reflective coating accentuates the intricate fiber details while maintaining a sleek, modern aesthetic suitable for automotive and technology applications. The material’s color palette is dominated by deep blacks with subtle bluish-gray highlights resulting from light interaction with the resin and fibers. The roughness map finely balances areas of smooth gloss and the microscopic irregularities of the fiber weave, while the normal and height maps enhance the perception of depth and curvature in the twisted strands. Metallic values are kept low to reflect the non-metallic nature of the composite, with ambient occlusion emphasizing the shadowing between tightly packed fibers for added realism.
Designed for high fidelity, this texture is rendered at an 8K resolution, ensuring exceptional detail and clarity on large-scale 3D models without visible tiling or pixelation. It is fully compatible and optimized for use in Blender, Unreal Engine, and Unity, supporting physically accurate shading workflows through correctly mapped BaseColor, Normal, Roughness, Metallic, Ambient Occlusion, and Height channels. The seamless tiling capability makes it ideal for wrapping complex surfaces such as automotive body panels, protective gear, or modern electronic device casings where a realistic carbon composite look is essential.
For best results when applying this texture, it is recommended to adjust the UV scale to match the model’s dimensions carefully, preserving the natural size and repetition of the twisted strands. Additionally, fine-tuning the roughness map can help achieve the desired gloss level, from a highly polished finish to a more matte, weathered appearance. When incorporating height or parallax mapping, blending these with the normal map can further enhance the tactile depth of the strands, delivering an immersive and authentic carbon fiber surface in any real-time or offline rendering scenario.
Import the texture maps into Blender with sRGB color space for albedo/base color and Non-Color for normal, roughness, metallic, AO, height, and ORM maps. Connect normal maps through a Normal Map node, then adjust UV scale with a Mapping node so the material repeats naturally on your model.
For the full step-by-step setup, see How to Use Seamless Textures in Blender. Browse related material examples in wood, concrete, and metal.
Yes. This texture is designed as a seamless tileable PBR material, so it can repeat across large surfaces without visible borders.
You can download PNG/WEBP versions and use 1K, 2K, 4K and 8K download options when available on the page.
Yes. The download options and engine-mapped ZIP workflow are designed for Blender, Unreal Engine, Unity Standard, URP and HDRP material pipelines.
Yes. The texture is available under the AITextured free commercial license. Review the license page for redistribution and AI-training restrictions.


Build, preview, and export seamless PBR materials. Generate full map sets from a single image, inspect them in a real-time WebGL viewer, and re-package maps for Unreal, Unity, and Blender—directly in your browser.
AI text-to-texture: type a prompt and get a seamless, tileable base image ready for PBR workflows (great starting point for materials).
Create a full PBR set (Normal, Roughness, AO, Metallic, etc.) from a single image. Seamless and tiling-friendly.
Instant WebGL viewer: inspect materials on a sphere, plane, and cube. Check tiling and lighting in real time.
Re-packages maps per engine: Unreal (BaseColor + ORM), Unity (Mask/MetallicSmoothness), Blender (separate channels).
PNG ↔ JPG ↔ SVG: fast convert, SVG rasterize, embed/trace options, quality & background controls.