
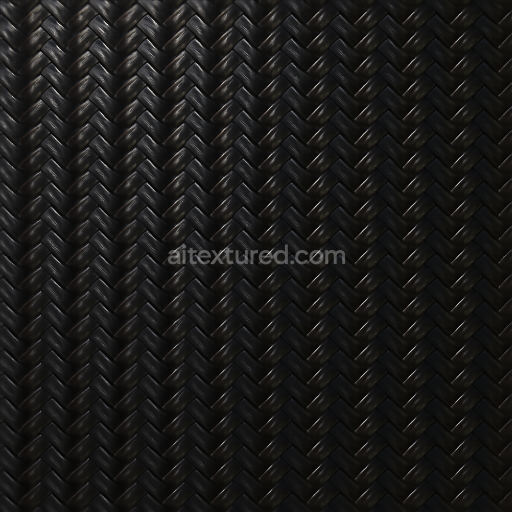
Woven Carbon Fiber PBR 8K Detail For Realistic Renders
Seamless texture (tileable) · PNG, WEBP, PBR ZIP. License: AITextured Free Commercial License (FCL) v1.1. Free personal and commercial use. Raw resale, standalone redistribution, mirroring/scraping, competing asset packs, and AI/ML training are not allowed without written permission. Attribution is not required, but appreciated..

| ID | seamless-3d-texture-of-carbon-honeycomb-weave-for-pbr-8k-resolution-realistic-surface-renders |
|---|---|
| Category | Carbon |
| Formats | PNG, WEBP, PBR ZIP |
| Size | 1k (1024x1024px), 2k (2048x2048px), 4k (4096x4096px), 8k (8192x8192px) |
| Color | sRGB |
| Tileable | Yes |
This seamless 3D texture showcases an intricate carbon honeycomb weave pattern, crafted to replicate the distinctive structure of advanced carbon fiber composites. The base material is a high-strength carbon fiber substrate, where ultra-fine carbon filaments are tightly woven into a hexagonal honeycomb geometry. This pattern not only enhances mechanical stiffness but also provides a visually complex surface with depth and dimensionality. The weave consists of alternating fiber bundles that create a subtle relief, accurately captured through detailed normal and height maps, which emphasize the three-dimensional form of each hexagonal cell and the overlapping fibers within.
The composite matrix integrates epoxy resin binders that hold the carbon fiber layers together, imparting durability and resistance to environmental factors. The surface finish is smooth yet exhibits a slight sheen typical of polished carbon composites, reflecting a soft glossier highlight rather than a mirror-like shine. The base color channel conveys a deep carbon black with subtle tonal variations caused by fiber orientation and resin translucency. Roughness maps are finely tuned to represent this semi-gloss surface, balancing light diffusion and specular reflection realistically. The metallic channel remains minimal to non-existent, as carbon composites are non-metallic, while ambient occlusion enhances the perception of depth in the honeycomb cavities and fiber intersections.
Designed for photorealistic rendering in Blender, Unreal Engine, and Unity, this 8K resolution texture ensures exceptional clarity and crisp detail even at close viewing distances. The high-resolution maps include BaseColor (Albedo) for authentic color fidelity, Normal and Height for precise surface relief, Roughness for accurate light scattering, and Ambient Occlusion to simulate subtle shadows within the honeycomb cells. This comprehensive PBR setup facilitates realistic material response under varying lighting conditions, making it ideal for automotive visualization, industrial design, and virtual prototyping where authentic carbon fiber representation is critical.
For optimal results, it is advisable to carefully adjust the UV scale to maintain the natural proportion of the honeycomb cells on your 3D model, preventing distortion that can break the pattern’s seamless appearance. Additionally, fine-tuning the roughness map can help simulate different finishes, from a matte, worn carbon fiber look to a more polished, modern surface. Blending the height and normal maps subtly can add further dimensional accuracy without causing rendering artifacts, enhancing the tactile realism of the carbon weave texture in your projects.
Import the texture maps into Blender with sRGB color space for albedo/base color and Non-Color for normal, roughness, metallic, AO, height, and ORM maps. Connect normal maps through a Normal Map node, then adjust UV scale with a Mapping node so the material repeats naturally on your model.
For the full step-by-step setup, see How to Use Seamless Textures in Blender. Browse related material examples in wood, concrete, and metal.
Yes. This texture is designed as a seamless tileable PBR material, so it can repeat across large surfaces without visible borders.
You can download PNG/WEBP versions and use 1K, 2K, 4K and 8K download options when available on the page.
Yes. The download options and engine-mapped ZIP workflow are designed for Blender, Unreal Engine, Unity Standard, URP and HDRP material pipelines.
Yes. The texture is available under the AITextured free commercial license. Review the license page for redistribution and AI-training restrictions.


Generate, preview, and export seamless PBR materials for Blender, Unity, and Unreal Engine—directly in your browser.
AI text-to-texture: type a prompt and get a seamless, tileable base image ready for PBR workflows (great starting point for materials).
Create a full PBR set (Normal, Roughness, AO, Metallic, etc.) from a single image. Seamless and tiling-friendly.
Instant WebGL viewer: inspect materials on a sphere, plane, and cube. Check tiling and lighting in real time.
Re-packages maps per engine: Unreal (BaseColor + ORM), Unity (Mask/MetallicSmoothness), Blender (separate channels).
PNG ↔ JPG ↔ SVG: fast convert, SVG rasterize, embed/trace options, quality & background controls.