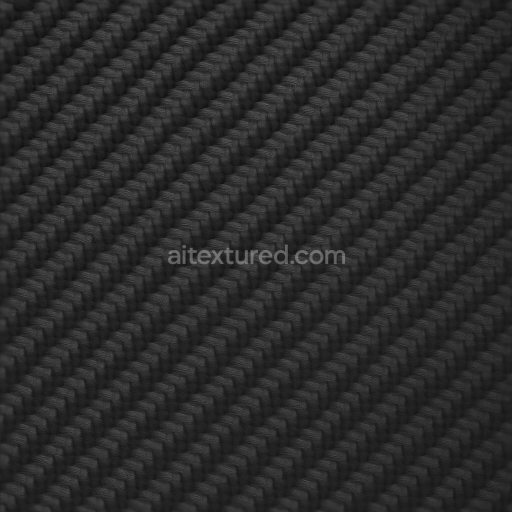
Carbon Synthetic Weave With Carbon Satin Finish For PBR 8K Realistic Renders
Seamless texture (tileable) · PNG, WEBP, PBR ZIP. License: AITextured Free Commercial License (FCL) v1.1. Free personal and commercial use. Raw resale, standalone redistribution, mirroring/scraping, competing asset packs, and AI/ML training are not allowed without written permission. Attribution is not required, but appreciated..

| ID | seamless-3d-pbr-texture-of-carbon-unidirectional-fiber-in-8k-resolution-for-tech-renders |
|---|---|
| Category | Carbon |
| Formats | PNG, WEBP, PBR ZIP |
| Size | 1k (1024x1024px), 2k (2048x2048px), 4k (4096x4096px), 8k (8192x8192px) |
| Color | sRGB |
| Tileable | Yes |
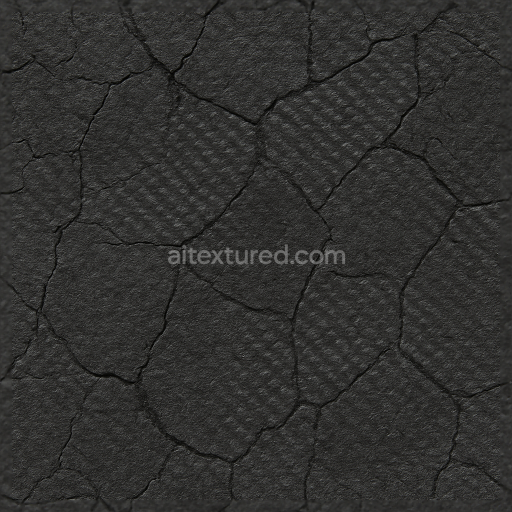
This seamless 3D PBR texture showcases a unidirectional carbon fiber weave, rendered at an exceptional 8K resolution to capture the fine structural details of this advanced composite material. The base material consists primarily of tightly packed carbon filaments aligned parallel to one another, embedded within a high-performance epoxy resin matrix. This resin acts as a binder, providing rigidity and durability while maintaining a smooth, matte surface finish that reduces glare and enhances realism. The geometric form is distinctly linear and repetitive, emphasizing the characteristic uniform directionality of the fibers, which creates subtle depth and shadowing effects along the length of each filament.
The texture’s BaseColor (Albedo) channel reflects the deep carbon black pigmentation, derived from the intrinsic color of the carbon fibers and enhanced by the matte epoxy coating. The Normal map accurately conveys the fine ridges and slight undulations of the fiber bundles, adding tactile realism to renders. The Roughness channel maintains a balanced mid-to-high value, simulating the soft, non-reflective surface typical of untreated carbon fiber composites. The Metallic map is effectively null, as carbon fiber composites are non-metallic; however, the Ambient Occlusion channel intensifies the subtle crevices between fiber bundles, increasing visual depth and contrast. Height/Displacement data captures the micro-relief of the surface texture, ideal for close-up renders requiring parallax or displacement mapping.
Crafted for technical visualization and modern design applications, this texture is optimized for use in Blender, Unreal Engine, and Unity, where its high resolution ensures crisp detail even in large-scale scenes. The unidirectional fiber pattern is ideal for simulating carbon components in automotive, aerospace, and sporting goods projects, where durability and a contemporary aesthetic are critical. The matte finish and linear fiber orientation lend a sleek, industrial feel without excessive reflectivity, making it suitable for both product visualization and architectural elements.
For practical application, it is recommended to adjust the UV scale to align fiber directionality precisely with model geometry, preserving the authenticity of the carbon weave. Additionally, fine-tuning the roughness map can help simulate different resin finishes, from slightly glossy to fully matte. When working with height and normal maps, blending these channels can enhance surface complexity without overloading render times, providing a balanced representation of the subtle relief and fiber texture inherent to carbon composites.
Import the texture maps into Blender with sRGB color space for albedo/base color and Non-Color for normal, roughness, metallic, AO, height, and ORM maps. Connect normal maps through a Normal Map node, then adjust UV scale with a Mapping node so the material repeats naturally on your model.
For the full step-by-step setup, see How to Use Seamless Textures in Blender. Browse related material examples in wood, concrete, and metal.
Yes. This texture is designed as a seamless tileable PBR material, so it can repeat across large surfaces without visible borders.
You can download PNG/WEBP versions and use 1K, 2K, 4K and 8K download options when available on the page.
Yes. The download options and engine-mapped ZIP workflow are designed for Blender, Unreal Engine, Unity Standard, URP and HDRP material pipelines.
Yes. The texture is available under the AITextured free commercial license. Review the license page for redistribution and AI-training restrictions.


Build, preview, and export seamless PBR materials. Generate full map sets from a single image, inspect them in a real-time WebGL viewer, and re-package maps for Unreal, Unity, and Blender—directly in your browser.
AI text-to-texture: type a prompt and get a seamless, tileable base image ready for PBR workflows (great starting point for materials).
Create a full PBR set (Normal, Roughness, AO, Metallic, etc.) from a single image. Seamless and tiling-friendly.
Instant WebGL viewer: inspect materials on a sphere, plane, and cube. Check tiling and lighting in real time.
Re-packages maps per engine: Unreal (BaseColor + ORM), Unity (Mask/MetallicSmoothness), Blender (separate channels).
PNG ↔ JPG ↔ SVG: fast convert, SVG rasterize, embed/trace options, quality & background controls.