Marigold Bloom Flower Petals Closeup Flower Garden Natural Lighting
Seamless texture (tileable) · PNG, WEBP, PBR ZIP. License: AITextured Free Commercial License (FCL) v1.1. Free personal and commercial use. Raw resale, standalone redistribution, mirroring/scraping, competing asset packs, and AI/ML training are not allowed without written permission. Attribution is not required, but appreciated..

| ID | seamless-3d-texture-pbr-8k-of-soft-peony-layers-featuring-detailed-flower-softness-and-subtle-color-gradients |
|---|---|
| Category | Flowers |
| Formats | PNG, WEBP, PBR ZIP |
| Size | 1k (1024x1024px), 2k (2048x2048px), 4k (4096x4096px), 8k (8192x8192px) |
| Color | sRGB |
| Tileable | Yes |
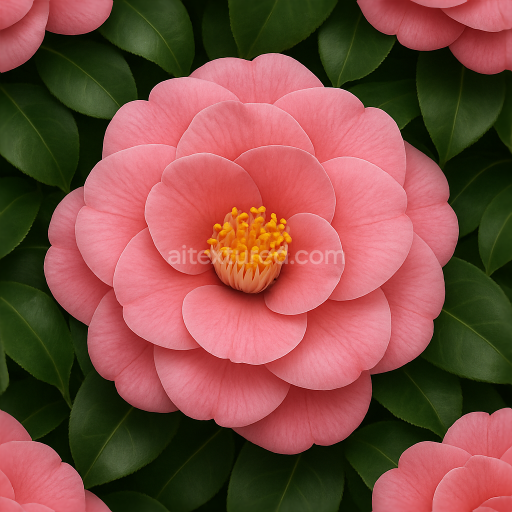
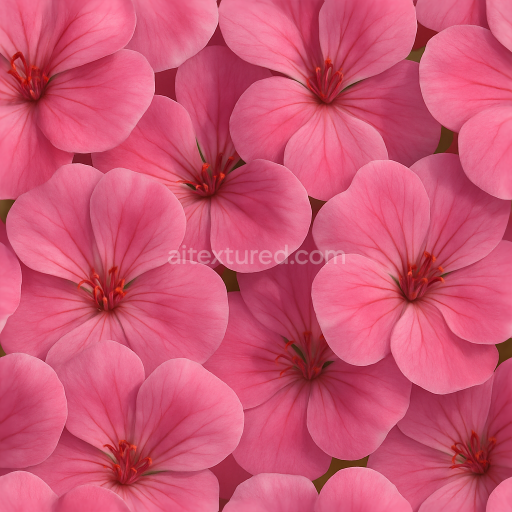
This seamless 3D texture captures the intricate layering of soft peony petals with exceptional detail, showcasing the natural form and delicate structure characteristic of these flowers. The material base resembles fine, translucent plant tissue—primarily composed of thin, overlapping cellulose layers that form the petal surfaces. These layers create a subtle laminar pattern that repeats seamlessly, mimicking the organic folding and gentle curvature of real petals. The texture’s form emphasizes the thinness and slight undulations of the flower surface, with softly rounded edges and natural overlaps that contribute to a sense of depth and volume. This geometry is ideal for close-up renders where flower softness and translucency are critical visual elements.
The composition reflects natural biological materials, where the petal substrate is a semi-translucent, fibrous matrix with minimal porosity, allowing light diffusion and soft shadows. The pigments consist of subtle gradients ranging from creamy whites and soft pinks to gentle blush tones, simulating the natural color variations found in peony petals. These pigments appear as finely dispersed organic colorants embedded within the petal layers, producing smooth transitions and delicate veining. There is no metallic component, as the surface is matte and non-reflective, with a naturally low roughness that results in a soft, velvety finish. The surface detail includes very fine micro-creases and vein-like texture, captured through high-resolution normal and height maps to enhance the tactile realism of the flower skin.
In terms of PBR workflow mapping, the BaseColor (Albedo) channel holds the subtle flower color variations and gradients essential for realistic shading. The Normal map encodes the delicate folds, micro-creases, and petal edges, bringing out the softness and physical depth of the layered petals. Roughness is kept moderately low and finely varied to replicate the matte, soft surface typical of fresh flower petals, avoiding any metallic reflections, which are set to zero. The Ambient Occlusion channel accentuates the petal overlaps and crevices, adding depth in shaded areas. The Height/Displacement map provides precise elevation data that enhances the layering effect, useful for parallax or tessellation techniques to simulate the gentle undulations of the flower surface.
This texture is delivered in an ultra-high 8K resolution, ensuring exceptional detail fidelity suitable for close-up renders and large-scale floral scenes. It is fully optimized for integration with Blender, Unreal Engine, and Unity, supporting tileable UV mapping for seamless repetition without visible borders. For practical use, it is advisable to carefully adjust the UV scale to maintain the natural size of peony petals in your scene. Additionally, tuning the roughness channel allows control over the perceived softness and sheen, while blending height and normal maps can help achieve the desired depth and tactile feel without excessive geometry complexity. This flexibility makes the texture ideal for photorealistic botanical visualizations, immersive environments, and detailed closeups of floral compositions.
Import the texture maps into Blender with sRGB color space for albedo/base color and Non-Color for normal, roughness, metallic, AO, height, and ORM maps. Connect normal maps through a Normal Map node, then adjust UV scale with a Mapping node so the material repeats naturally on your model.
For the full step-by-step setup, see How to Use Seamless Textures in Blender. Browse related material examples in wood, concrete, and metal.
Yes. This texture is designed as a seamless tileable PBR material, so it can repeat across large surfaces without visible borders.
You can download PNG/WEBP versions and use 1K, 2K, 4K and 8K download options when available on the page.
Yes. The download options and engine-mapped ZIP workflow are designed for Blender, Unreal Engine, Unity Standard, URP and HDRP material pipelines.
Yes. The texture is available under the AITextured free commercial license. Review the license page for redistribution and AI-training restrictions.


Build, preview, and export seamless PBR materials. Generate full map sets from a single image, inspect them in a real-time WebGL viewer, and re-package maps for Unreal, Unity, and Blender—directly in your browser.
AI text-to-texture: type a prompt and get a seamless, tileable base image ready for PBR workflows (great starting point for materials).
Create a full PBR set (Normal, Roughness, AO, Metallic, etc.) from a single image. Seamless and tiling-friendly.
Instant WebGL viewer: inspect materials on a sphere, plane, and cube. Check tiling and lighting in real time.
Re-packages maps per engine: Unreal (BaseColor + ORM), Unity (Mask/MetallicSmoothness), Blender (separate channels).
PNG ↔ JPG ↔ SVG: fast convert, SVG rasterize, embed/trace options, quality & background controls.