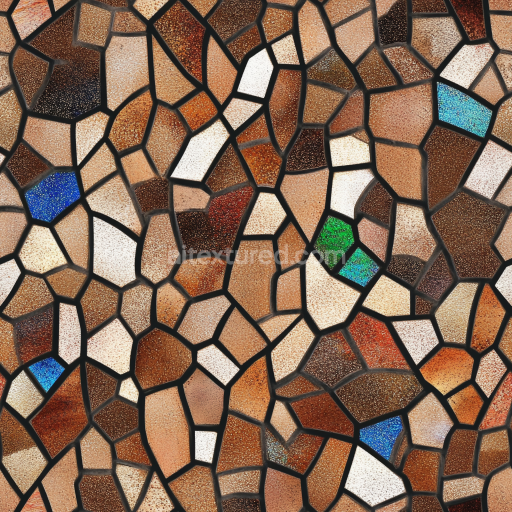
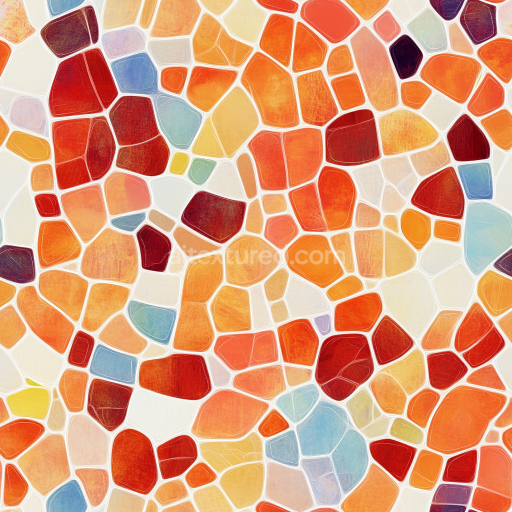
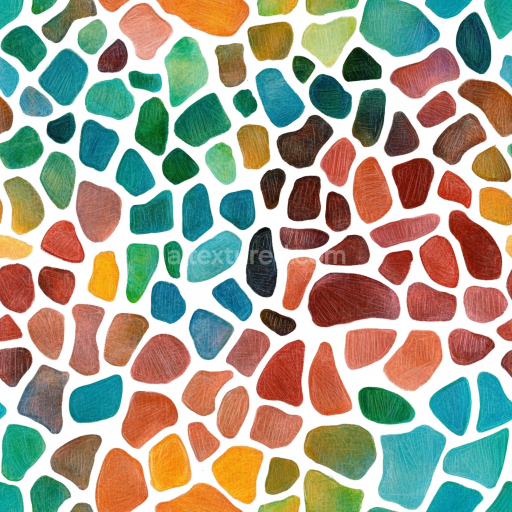
mosaic PBR texture featuring earthy ceramic shards with colorful glass accents
Seamless texture (tileable) · PNG, WEBP, PBR ZIP. License: AITextured Free Commercial License (FCL) v1.1. Free personal and commercial use. Raw resale, standalone redistribution, mirroring/scraping, competing asset packs, and AI/ML training are not allowed without written permission. Attribution is not required, but appreciated..

| ID | seamless-3d-texture-pbr-8k-broken-tile-mosaic-featuring-distressed-ceramic-cracked-tiles-with-earth-tones |
|---|---|
| Category | Mosaic |
| Formats | PNG, WEBP, PBR ZIP |
| Size | 1k (1024x1024px), 2k (2048x2048px), 4k (4096x4096px), 8k (8192x8192px) |
| Color | sRGB |
| Tileable | Yes |
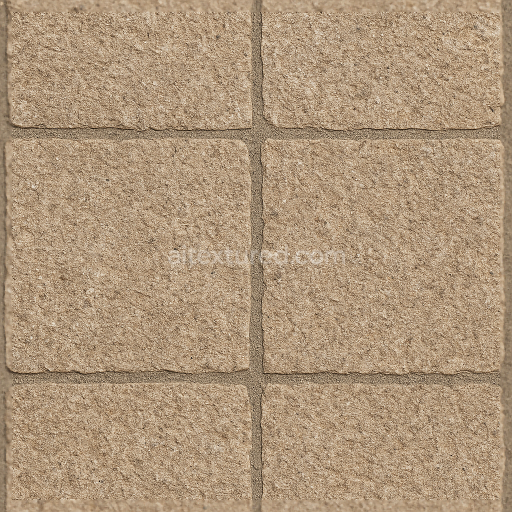
This seamless 3D texture features a broken tile mosaic composed primarily of distressed ceramic tiles arranged in an irregular, fractured pattern that mimics natural wear and damage. The geometric form is a fragmented tile layout with uneven edges and varied tile sizes, creating a dynamic surface of cracked and chipped pieces. The base material is ceramic clay, fired and glazed with earth-toned pigments that provide a warm and organic color palette, ranging from muted browns and ochres to soft terracotta hues. The ceramic substrate is visibly porous in areas where the glaze has worn thin, revealing a slightly rough, matte surface beneath the smoother glazed portions. This interplay of surface finishes—from glazed to weathered matte—gives the mosaic a tactile depth and authenticity.
Compositionally, the texture simulates ceramic tiles bonded to a cementitious mortar substrate, where the grout lines show subtle signs of erosion and discoloration, enhancing the distressed look. The ceramic tiles contain fine mineral aggregates within the clay body, visible in the cracked and chipped areas, accentuating the material’s brittle nature. The fissures and cracks vary in depth and width, indicative of long-term mechanical stress and environmental exposure. Pigments embedded in the glaze reflect natural earth minerals, which contribute to the subtle tonal variations across the tile surfaces. The overall porosity and weathering effects are carefully represented through micro-surface details that influence light interaction, such as slight roughness variations and micro-normal deviations.
From a PBR texturing perspective, the BaseColor (Albedo) channel captures the nuanced earth tones and glazed ceramic finishes without baked-in shadows, ensuring versatility under varied lighting conditions. The Normal map encodes the intricate surface geometry of cracked tile edges, chipped corners, and weathered grout, providing pronounced depth and relief. The Roughness map varies across the texture, with higher roughness values on the distressed, matte ceramic areas and lower values on the still-glazed tile faces, creating realistic specular highlights and diffuse reflections. The Metallic map is consistently low, reflecting the non-metallic ceramic nature of the material. Ambient Occlusion enhances crevices and grout lines for natural shadowing, while the Height/Displacement map conveys the subtle elevation differences between tile fragments and grout, enriching parallax and displacement effects.
Rendered in ultra-high 8K resolution, this texture delivers exceptional detail suitable for close-up renders and large surfaces. It is fully optimized for seamless tiling in 3D software such as Blender, Unreal Engine, and Unity, ensuring smooth repetition without visible seams. For practical application, adjusting the UV scale to maintain tile proportions is recommended, especially when the mosaic pattern is used on curved or uneven surfaces. Additionally, fine-tuning the roughness channel can help balance the glazed versus worn ceramic areas depending on the desired material aging effect. Blending the height map subtly with normal maps can enhance surface dimensionality without excessive geometry displacement, optimizing performance in real-time engines while preserving photorealism.
Import the texture maps into Blender with sRGB color space for albedo/base color and Non-Color for normal, roughness, metallic, AO, height, and ORM maps. Connect normal maps through a Normal Map node, then adjust UV scale with a Mapping node so the material repeats naturally on your model.
For the full step-by-step setup, see How to Use Seamless Textures in Blender. Browse related material examples in wood, concrete, and metal.
Yes. This texture is designed as a seamless tileable PBR material, so it can repeat across large surfaces without visible borders.
You can download PNG/WEBP versions and use 1K, 2K, 4K and 8K download options when available on the page.
Yes. The download options and engine-mapped ZIP workflow are designed for Blender, Unreal Engine, Unity Standard, URP and HDRP material pipelines.
Yes. The texture is available under the AITextured free commercial license. Review the license page for redistribution and AI-training restrictions.


Build, preview, and export seamless PBR materials. Generate full map sets from a single image, inspect them in a real-time WebGL viewer, and re-package maps for Unreal, Unity, and Blender—directly in your browser.
AI text-to-texture: type a prompt and get a seamless, tileable base image ready for PBR workflows (great starting point for materials).
Create a full PBR set (Normal, Roughness, AO, Metallic, etc.) from a single image. Seamless and tiling-friendly.
Instant WebGL viewer: inspect materials on a sphere, plane, and cube. Check tiling and lighting in real time.
Re-packages maps per engine: Unreal (BaseColor + ORM), Unity (Mask/MetallicSmoothness), Blender (separate channels).
PNG ↔ JPG ↔ SVG: fast convert, SVG rasterize, embed/trace options, quality & background controls.