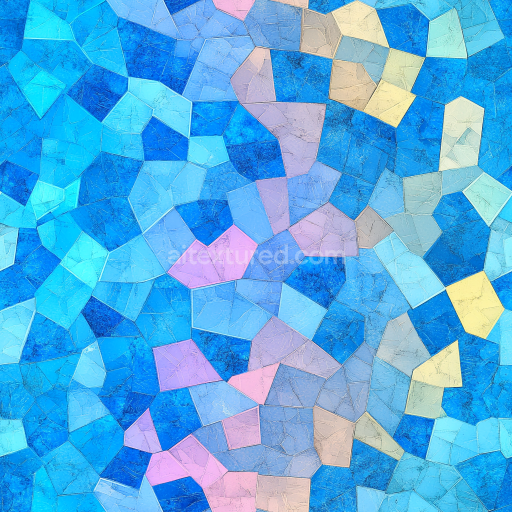
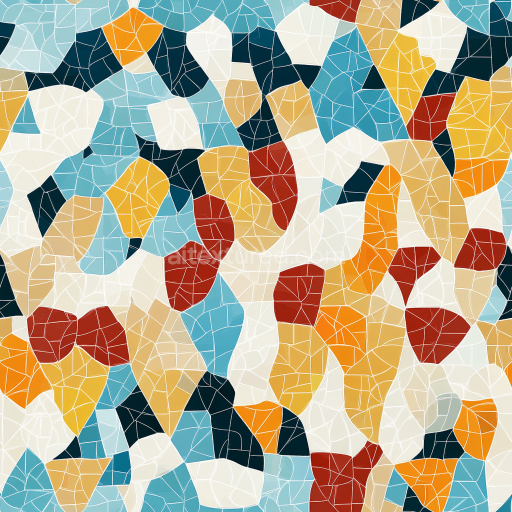
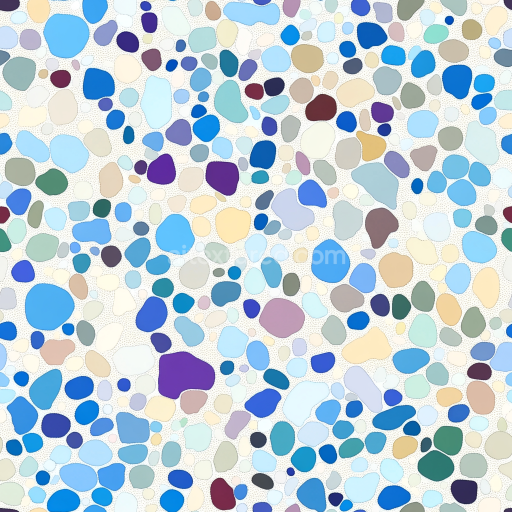
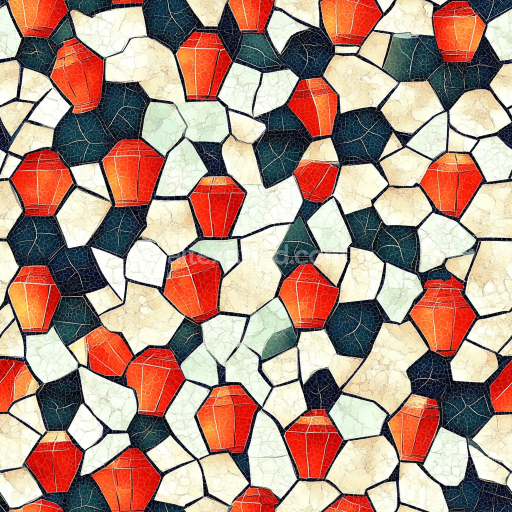
Irregular Mosaic PBR Texture with Vibrant Multicolor Tiles
Seamless texture (tileable) · PNG, WEBP, PBR ZIP. License: AITextured Free Commercial License (FCL) v1.1. Free personal and commercial use. Raw resale, standalone redistribution, mirroring/scraping, competing asset packs, and AI/ML training are not allowed without written permission. Attribution is not required, but appreciated..

| ID | seamless-3d-texture-pbr-8k-porcelain-shards-mosaic-with-antique-ceramic-style-and-cracked-glaze |
|---|---|
| Category | Mosaic |
| Formats | PNG, WEBP, PBR ZIP |
| Size | 1k (1024x1024px), 2k (2048x2048px), 4k (4096x4096px), 8k (8192x8192px) |
| Color | sRGB |
| Tileable | Yes |
This seamless 3D texture presents a meticulously crafted mosaic composed of irregular porcelain shards, inspired by antique ceramic tiles characterized by their distinctive cracked glaze. The base material consists primarily of fine porcelain, a vitrified ceramic known for its hardness and translucency. These shards exhibit subtle variations in thickness and curvature, forming an intricate, non-uniform pattern that mimics authentic hand-laid ceramic inlays. The shards are set into a slightly recessed tile grout substrate, which provides both structural cohesion and visual contrast. This grout is matte and porous, simulating aged mortar with faint weathering effects. The overall geometric form is an organic arrangement of fragmented pieces rather than regular shapes, emphasizing the artisanal quality of the mosaic.
The texture’s surface finish features a glossy, high-reflectance glaze that accentuates the cracked patterning typical of antique ceramics. This glaze layer is thin yet durable, with microfractures that create a subtle network of fine cracks, adding depth and historical character to the texture. Colorants embedded in the porcelain range from soft off-whites to muted earth tones, capturing the slight discoloration and patina developed over time. The PBR maps are carefully aligned to convey these material qualities: the BaseColor (Albedo) channel captures the nuanced color variations and subtle stains; the Normal and Height maps provide detailed surface relief, including the shards’ edges, glaze cracks, and grout recesses. Roughness is low and varied, reflecting the glossy glaze with slight irregularities where the glaze has worn thin. Metallic values remain near zero, consistent with non-metallic ceramic materials. Ambient Occlusion enhances the perception of depth around the grout lines and shard edges, contributing to realism.
Resolution at 8K ensures that fine details such as micro-cracks, glaze imperfections, and subtle surface undulations remain crisp even on close inspection, making this texture highly suitable for use in Blender, Unreal Engine, and Unity projects. The seamless nature of the texture facilitates its application on large surfaces without visible repetition, ideal for heritage visualizations, interior architectural renders, or digital art requiring a classic cracked glaze mosaic aesthetic. The texture’s composition and form provide a rich tactile impression, simulating the irregularities and relief of real porcelain shard mosaics.
For optimal results, it is recommended to carefully adjust UV scaling to maintain the delicate balance between shard size and grout width, preserving the natural irregularity without overwhelming detail repetition. Additionally, fine-tuning the roughness map can help simulate varying glaze wear levels, making the mosaic appear either freshly polished or gently aged. When integrating height or parallax effects, blending the height map subtly with the normal map enhances surface depth without causing distortion, maintaining the integrity of the shard edges and grout recesses under dynamic lighting.
Import the texture maps into Blender with sRGB color space for albedo/base color and Non-Color for normal, roughness, metallic, AO, height, and ORM maps. Connect normal maps through a Normal Map node, then adjust UV scale with a Mapping node so the material repeats naturally on your model.
For the full step-by-step setup, see How to Use Seamless Textures in Blender. Browse related material examples in wood, concrete, and metal.
Yes. This texture is designed as a seamless tileable PBR material, so it can repeat across large surfaces without visible borders.
You can download PNG/WEBP versions and use 1K, 2K, 4K and 8K download options when available on the page.
Yes. The download options and engine-mapped ZIP workflow are designed for Blender, Unreal Engine, Unity Standard, URP and HDRP material pipelines.
Yes. The texture is available under the AITextured free commercial license. Review the license page for redistribution and AI-training restrictions.


Build, preview, and export seamless PBR materials. Generate full map sets from a single image, inspect them in a real-time WebGL viewer, and re-package maps for Unreal, Unity, and Blender—directly in your browser.
AI text-to-texture: type a prompt and get a seamless, tileable base image ready for PBR workflows (great starting point for materials).
Create a full PBR set (Normal, Roughness, AO, Metallic, etc.) from a single image. Seamless and tiling-friendly.
Instant WebGL viewer: inspect materials on a sphere, plane, and cube. Check tiling and lighting in real time.
Re-packages maps per engine: Unreal (BaseColor + ORM), Unity (Mask/MetallicSmoothness), Blender (separate channels).
PNG ↔ JPG ↔ SVG: fast convert, SVG rasterize, embed/trace options, quality & background controls.