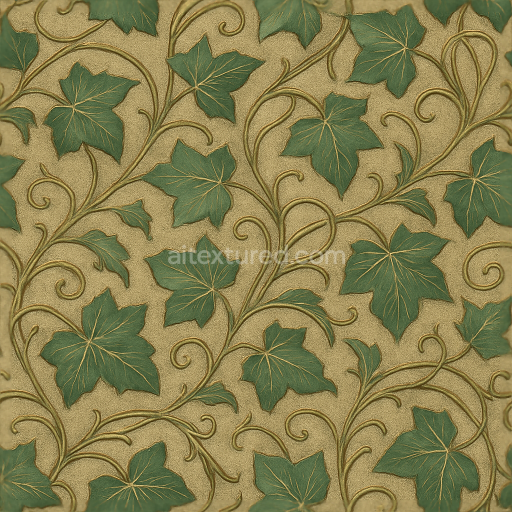
Art Nouveau Botanical Ivy Wallpaper With Textured Woven Silk Sheen And Metallic Accents
Seamless texture (tileable) · PNG, WEBP, PBR ZIP. License: AITextured Free Commercial License (FCL) v1.1. Free personal and commercial use. Raw resale, standalone redistribution, mirroring/scraping, competing asset packs, and AI/ML training are not allowed without written permission. Attribution is not required, but appreciated..

| ID | seamless-3d-texture-pbr-8k-wallpaper-with-minimalist-abstract-tone-on-tone-chalkboard |
|---|---|
| Category | Wallpaper |
| Formats | PNG, WEBP, PBR ZIP |
| Size | 1k (1024x1024px), 2k (2048x2048px), 4k (4096x4096px), 8k (8192x8192px) |
| Color | sRGB |
| Tileable | Yes |
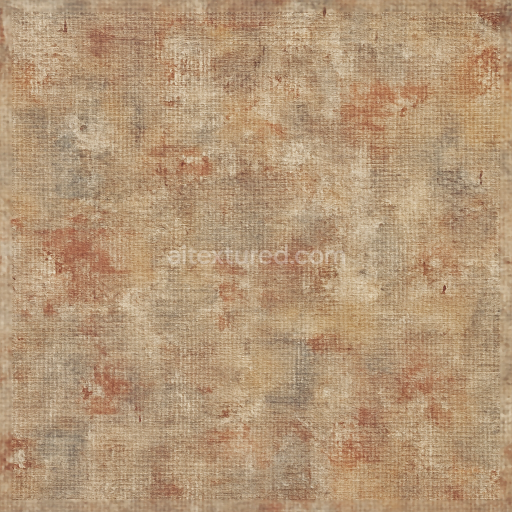
This wallpaper texture features a seamless 3D design inspired by minimalist abstract patterns that evoke the subtle complexity of a chalkboard surface. The base material is modeled on a woven textile substrate resembling washed linen fabric with a finely detailed textile weave. This creates a soft matte finish with delicate variations in fiber density and an understated tone-on-tone color scheme. The color palette is muted relying on chalky off-whites and soft grays that simulate pigments blended into the fabric lending the pattern a naturally weathered and gently worn appearance. The geometric form is abstract yet orderly with organic interlacing fibers visible beneath the smooth matte surface emphasizing a tactile depth and cloth-like softness without sharp contrast.
Technically the texture composition includes a porous woven fabric base where cellulose or cotton fibers are bound together with subtle resinous adhesives that simulate the stiffness and slight roughness of linen. The normal map captures the fine grain of the textile weave and subtle indentations reminiscent of chalk marks enhancing the tactile feel. The roughness channel is calibrated to replicate the matte non-reflective finish typical of chalkboards and washed linens while the metallic channel remains near zero to maintain the non-metallic textile-like character. Ambient occlusion enhances the weave’s depth and the micro-shadows between threads and the height/displacement map provides gentle surface undulations that add realism when used with parallax or displacement techniques.
Rendered in pristine 8K resolution this PBR texture ensures exceptional detail and clarity suitable for high-end 3D visualization. It is fully compatible with Blender Unreal Engine and Unity workflows supporting physically-based rendering pipelines that benefit from the accurate separation of base color normal roughness and height data. The seamless nature of the texture allows for infinite tiling without visible repetition making it ideal for large surfaces such as feature walls or virtual environments requiring subtle realistic fabric surfaces.
For practical application it is recommended to carefully adjust the UV scale to preserve the visible textile weave detail as over-scaling can cause loss of the intricate fiber patterns. Additionally tuning the roughness level can help achieve the desired balance between matte chalkboard softness and fabric texture depending on lighting conditions. When using the height map blend it moderately with the normal map to avoid exaggerated surface distortion ensuring the texture remains understated and suitable for minimalist interior visualizations or architectural renders.
Import the texture maps into Blender with sRGB color space for albedo/base color and Non-Color for normal, roughness, metallic, AO, height, and ORM maps. Connect normal maps through a Normal Map node, then adjust UV scale with a Mapping node so the material repeats naturally on your model.
For the full step-by-step setup, see How to Use Seamless Textures in Blender. Browse related material examples in wood, concrete, and metal.
Yes. This texture is designed as a seamless tileable PBR material, so it can repeat across large surfaces without visible borders.
You can download PNG/WEBP versions and use 1K, 2K, 4K and 8K download options when available on the page.
Yes. The download options and engine-mapped ZIP workflow are designed for Blender, Unreal Engine, Unity Standard, URP and HDRP material pipelines.
Yes. The texture is available under the AITextured free commercial license. Review the license page for redistribution and AI-training restrictions.


Generate, preview, and export seamless PBR materials for Blender, Unity, and Unreal Engine—directly in your browser.
AI text-to-texture: type a prompt and get a seamless, tileable base image ready for PBR workflows (great starting point for materials).
Create a full PBR set (Normal, Roughness, AO, Metallic, etc.) from a single image. Seamless and tiling-friendly.
Instant WebGL viewer: inspect materials on a sphere, plane, and cube. Check tiling and lighting in real time.
Re-packages maps per engine: Unreal (BaseColor + ORM), Unity (Mask/MetallicSmoothness), Blender (separate channels).
PNG ↔ JPG ↔ SVG: fast convert, SVG rasterize, embed/trace options, quality & background controls.