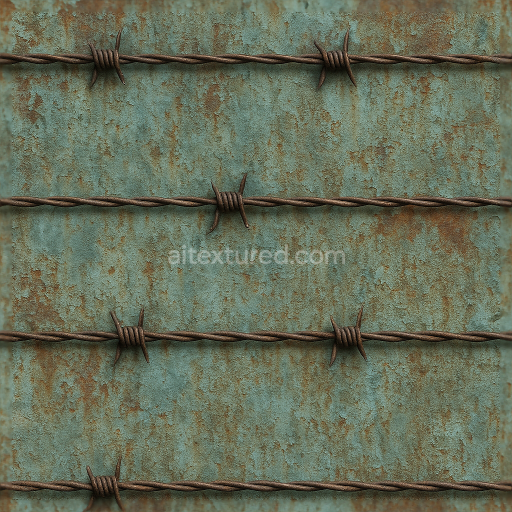
Seamless 8K 3D Texture PBR Metal Fence With Galvanized Metal And Oxidized Metal Surfaces
Seamless texture (tileable) · PNG, WEBP, PBR ZIP. License: AITextured Free Commercial License (FCL) v1.1. Free personal and commercial use. Raw resale, standalone redistribution, mirroring/scraping, competing asset packs, and AI/ML training are not allowed without written permission. Attribution is not required, but appreciated..

| ID | seamless-8k-3d-texture-pbr-vinyl-fence-with-painted-vinyl-white-fence-featuring-smooth-surfaces |
|---|---|
| Category | Fences |
| Formats | PNG, WEBP, PBR ZIP |
| Size | 1k (1024x1024px), 2k (2048x2048px), 4k (4096x4096px), 8k (8192x8192px) |
| Color | sRGB |
| Tileable | Yes |
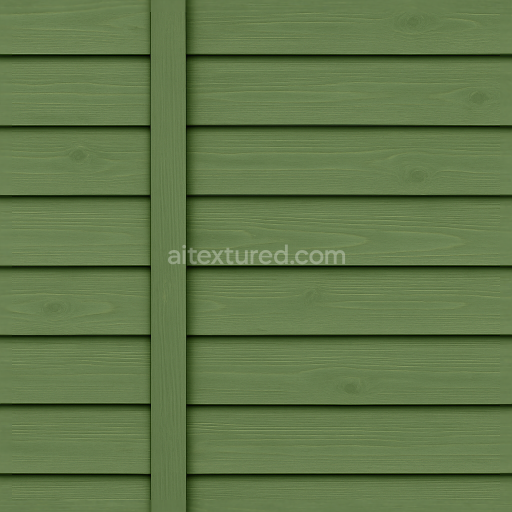
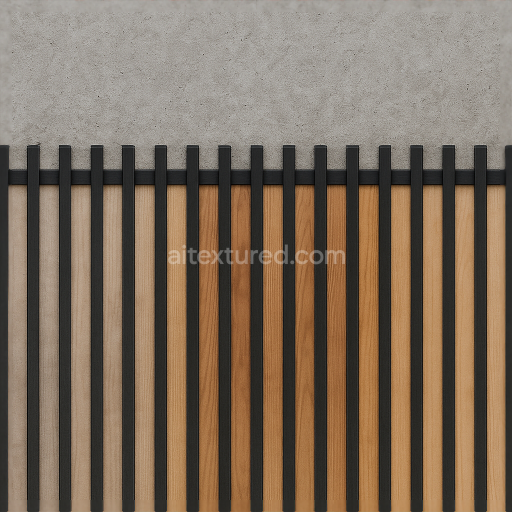
This seamless 8K PBR 3D texture represents a vinyl fence designed with a painted white finish that closely mimics smooth wood grain. The underlying material is composed primarily of polyvinyl chloride (PVC), a durable synthetic polymer known for its weather resistance and low maintenance requirements. The fence’s form consists of horizontal slats arranged uniformly, supported by vertical posts and horizontal rails, creating a classic, orderly pattern typical of residential fencing. The smooth surfaces are achieved through a finely calibrated manufacturing process where the vinyl is extruded and treated to resemble freshly painted wood, with subtle grain lines and minimal surface irregularities that contribute to the realistic effect without compromising the clean aesthetic.
The texture’s structure reflects the physical composition of vinyl fencing: a rigid, non-porous substrate reinforced with stabilizers and plasticizers to maintain flexibility and toughness, combined with titanium dioxide pigments responsible for the vibrant white coloration. The surface finish is glossy yet soft, replicating the slight sheen of new paint while avoiding excessive reflectivity, which enhances the material’s natural appearance under varying lighting conditions. The texture maps include a detailed Normal map that captures the gentle wood grain and the edges of the horizontal slats, a Roughness map calibrated to balance smoothness with faint surface imperfections, and an Ambient Occlusion map that accentuates the depth around fence posts and slat overlaps. The Height/Displacement map subtly enhances the perception of depth on the slat edges and painted surface texture without exaggerating surface irregularities. Metallic values are kept minimal to reflect vinyl’s non-metallic, polymeric nature.
Rendered at an ultra-high 8K resolution, this texture ensures exceptional detail and clarity suitable for close-up views and large-scale fence applications. It is optimized for seamless tiling, facilitating coverage of expansive residential or garden fence areas with consistent visual fidelity. Compatibility with Blender, Unreal Engine, and Unity is assured, making it a versatile asset for architectural visualization, game environments, and outdoor scene creation. The realistic portrayal of painted vinyl with subtle wood-like characteristics provides a balanced blend of synthetic and natural aesthetics, ideal for projects requiring clean, modern fencing elements.
For optimal use, it is recommended to adjust the UV scale carefully to maintain the proportional size of horizontal slats relative to the scene, preventing distortion or repetition artifacts. Additionally, fine-tuning the Roughness map can enhance realism depending on environmental conditions—lower roughness values for wet or freshly painted surfaces, higher for slightly weathered appearances. Incorporating the Height map with parallax or displacement techniques can also add convincing depth, especially in close camera angles, enriching the tactile impression of the painted vinyl fence texture.
Import the texture maps into Blender with sRGB color space for albedo/base color and Non-Color for normal, roughness, metallic, AO, height, and ORM maps. Connect normal maps through a Normal Map node, then adjust UV scale with a Mapping node so the material repeats naturally on your model.
For the full step-by-step setup, see How to Use Seamless Textures in Blender. Browse related material examples in wood, concrete, and metal.
Yes. This texture is designed as a seamless tileable PBR material, so it can repeat across large surfaces without visible borders.
You can download PNG/WEBP versions and use 1K, 2K, 4K and 8K download options when available on the page.
Yes. The download options and engine-mapped ZIP workflow are designed for Blender, Unreal Engine, Unity Standard, URP and HDRP material pipelines.
Yes. The texture is available under the AITextured free commercial license. Review the license page for redistribution and AI-training restrictions.

Build, preview, and export seamless PBR materials. Generate full map sets from a single image, inspect them in a real-time WebGL viewer, and re-package maps for Unreal, Unity, and Blender—directly in your browser.
AI text-to-texture: type a prompt and get a seamless, tileable base image ready for PBR workflows (great starting point for materials).
Create a full PBR set (Normal, Roughness, AO, Metallic, etc.) from a single image. Seamless and tiling-friendly.
Instant WebGL viewer: inspect materials on a sphere, plane, and cube. Check tiling and lighting in real time.
Re-packages maps per engine: Unreal (BaseColor + ORM), Unity (Mask/MetallicSmoothness), Blender (separate channels).
PNG ↔ JPG ↔ SVG: fast convert, SVG rasterize, embed/trace options, quality & background controls.