Seamless 8K 3D Texture PBR Rough Wood Fence Post With Knots And Splinters In Aged Wood Fi…
Seamless texture (tileable) · PNG, WEBP, PBR ZIP. License: AITextured Free Commercial License (FCL) v1.1. Free personal and commercial use. Raw resale, standalone redistribution, mirroring/scraping, competing asset packs, and AI/ML training are not allowed without written permission. Attribution is not required, but appreciated..

| ID | seamless-3d-texture-pbr-8k-rusty-metal-fence-with-metal-rust-and-rough-concrete-base |
|---|---|
| Category | Fences |
| Formats | PNG, WEBP, PBR ZIP |
| Size | 1k (1024x1024px), 2k (2048x2048px), 4k (4096x4096px), 8k (8192x8192px) |
| Color | sRGB |
| Tileable | Yes |
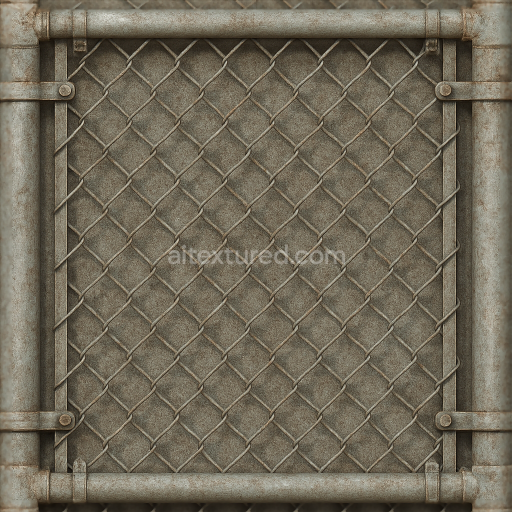
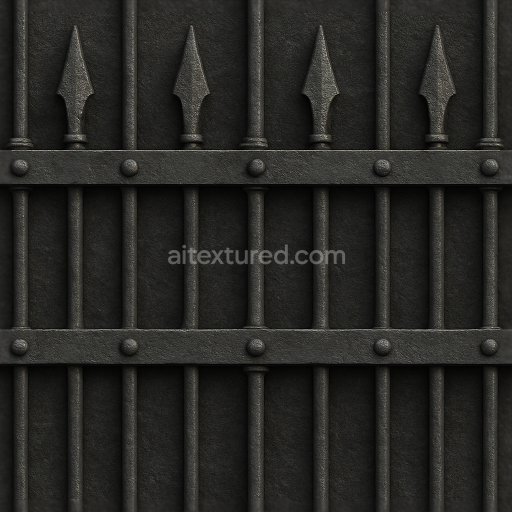
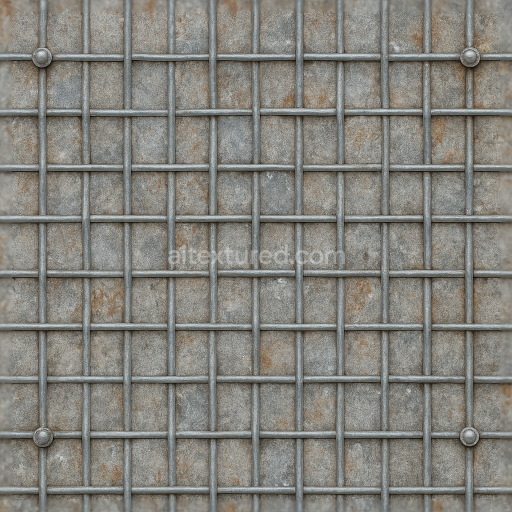
This seamless 3D texture presents an ultra-high-definition 8K photorealistic portrayal of a rusty metal fence combined with a rough concrete base, designed with physically based rendering (PBR) principles. The metal component is primarily composed of aged steel, exhibiting extensive oxidation and corrosion patterns, where the original smooth metallic surface has given way to layers of flaky rust and pitting. The rusted metal reveals a complex composition: the steel substrate serves as the base material, while iron oxide forms the rust layer, providing rich reddish-brown and orange pigments. The surface finish is heavily oxidized and uneven, with a rough, weathered texture that captures the natural degradation caused by prolonged exposure to moisture and air. This intricacy is reflected in the PBR BaseColor map, where rusty hues blend with residual dark gray metal tones, while the Normal and Height maps emphasize the uneven, cracked surface geometry and pits characteristic of metal corrosion.
The concrete base supporting the fence is modeled with a coarse aggregate mix embedded in a cement binder, resulting in a visibly rough and porous surface. The concrete exhibits typical weathering effects such as micro-cracks, small chips, and fine grain texture, which are critical for conveying realism in 3D applications. The aggregate particles vary in size and shape, creating subtle surface irregularities that contribute to the diffuse scattering of light. The rough concrete’s color ranges from pale gray to slightly weathered, off-white tones, with occasional darker spots indicating dirt or moisture absorption. In the PBR workflow, this translates to a moderately high Roughness value for the concrete area and a low to zero Metallic value. The Ambient Occlusion map enhances depth perception by darkening recessed cracks and crevices, while the Height map defines the subtle elevations and depressions across the concrete substrate.
Geometrically, the metal fence features a repeating vertical and horizontal bar pattern, forming a grid-like lattice that is common in industrial and security fencing. The bars are cylindrical with slightly flattened surfaces, showing rounded edges softened by corrosion. This pattern is perfectly tileable, allowing the texture to be repeated seamlessly across large surfaces without visible borders or mismatches. The texture’s seamless nature is optimized for use in popular 3D engines such as Blender, Unreal Engine, and Unity, ensuring compatibility and ease of integration. The Normal map accurately simulates the roughness and small-scale details of both metal rust and concrete textures, creating realistic light interactions and shadows that respond dynamically to scene lighting.
For practical application, it is recommended to carefully adjust the UV scale to maintain the natural size of the rust and concrete details, avoiding overly stretched or compressed appearances. Additionally, fine-tuning the Roughness map can help achieve desired surface reflections, especially when simulating wet or freshly rained-on conditions by lowering roughness values slightly. Combining the Height map with parallax or normal blending techniques can further enhance the perception of depth for close-up renders, making the texture particularly effective for industrial environments, outdoor fencing, and architectural visualizations requiring authentic weathered materials.
Import the texture maps into Blender with sRGB color space for albedo/base color and Non-Color for normal, roughness, metallic, AO, height, and ORM maps. Connect normal maps through a Normal Map node, then adjust UV scale with a Mapping node so the material repeats naturally on your model.
For the full step-by-step setup, see How to Use Seamless Textures in Blender. Browse related material examples in wood, concrete, and metal.
Yes. This texture is designed as a seamless tileable PBR material, so it can repeat across large surfaces without visible borders.
You can download PNG/WEBP versions and use 1K, 2K, 4K and 8K download options when available on the page.
Yes. The download options and engine-mapped ZIP workflow are designed for Blender, Unreal Engine, Unity Standard, URP and HDRP material pipelines.
Yes. The texture is available under the AITextured free commercial license. Review the license page for redistribution and AI-training restrictions.
Build, preview, and export seamless PBR materials. Generate full map sets from a single image, inspect them in a real-time WebGL viewer, and re-package maps for Unreal, Unity, and Blender—directly in your browser.
AI text-to-texture: type a prompt and get a seamless, tileable base image ready for PBR workflows (great starting point for materials).
Create a full PBR set (Normal, Roughness, AO, Metallic, etc.) from a single image. Seamless and tiling-friendly.
Instant WebGL viewer: inspect materials on a sphere, plane, and cube. Check tiling and lighting in real time.
Re-packages maps per engine: Unreal (BaseColor + ORM), Unity (Mask/MetallicSmoothness), Blender (separate channels).
PNG ↔ JPG ↔ SVG: fast convert, SVG rasterize, embed/trace options, quality & background controls.